Study Notes
Overview
In OCR GCSE Art and Design, particularly within the Graphic Communication specialism, typography is not merely the act of writing with fonts. It is the art and technique of arranging type to make written language legible, readable, and appealing when displayed. Examiners are looking for candidates who can move beyond default settings and treat letterforms as structural and expressive elements within a composition. A sophisticated understanding of typography is a hallmark of high-achieving work and is credited across all four Assessment Objectives (AOs). This guide will equip you with the theoretical knowledge and practical skills to excel.
Key Knowledge & Theory
Core Concepts
Understanding the foundational principles of typography is essential for earning marks in AO1 (Contextual Understanding) and AO3 (Recording Ideas). You must use the correct terminology in your annotations to demonstrate your knowledge.
1. Typeface Classification:
- Serif: Typefaces with small decorative strokes (serifs) at the end of the main strokes of letters. They are often associated with tradition, authority, and are highly readable for long passages of text (e.g., books, newspapers). Examples: Times New Roman, Garamond, Bodoni.
- Sans-serif: Typefaces without serifs ('sans' is French for 'without'). They have a clean, modern, and geometric appearance. Examples: Helvetica, Futura, Gill Sans.
- Slab Serif: Characterised by thick, block-like serifs. These typefaces are bold, impactful, and often used for headlines and posters. Examples: Rockwell, Clarendon.
- Script: Mimics the fluid strokes of handwriting. They can be formal or informal, and are used to convey elegance, personality, or authenticity. Examples: Snell Roundhand, Bickham Script.
- Display/Decorative: A broad category of typefaces designed for high impact at large sizes, such as in headlines or logos. They are often not suitable for body text.
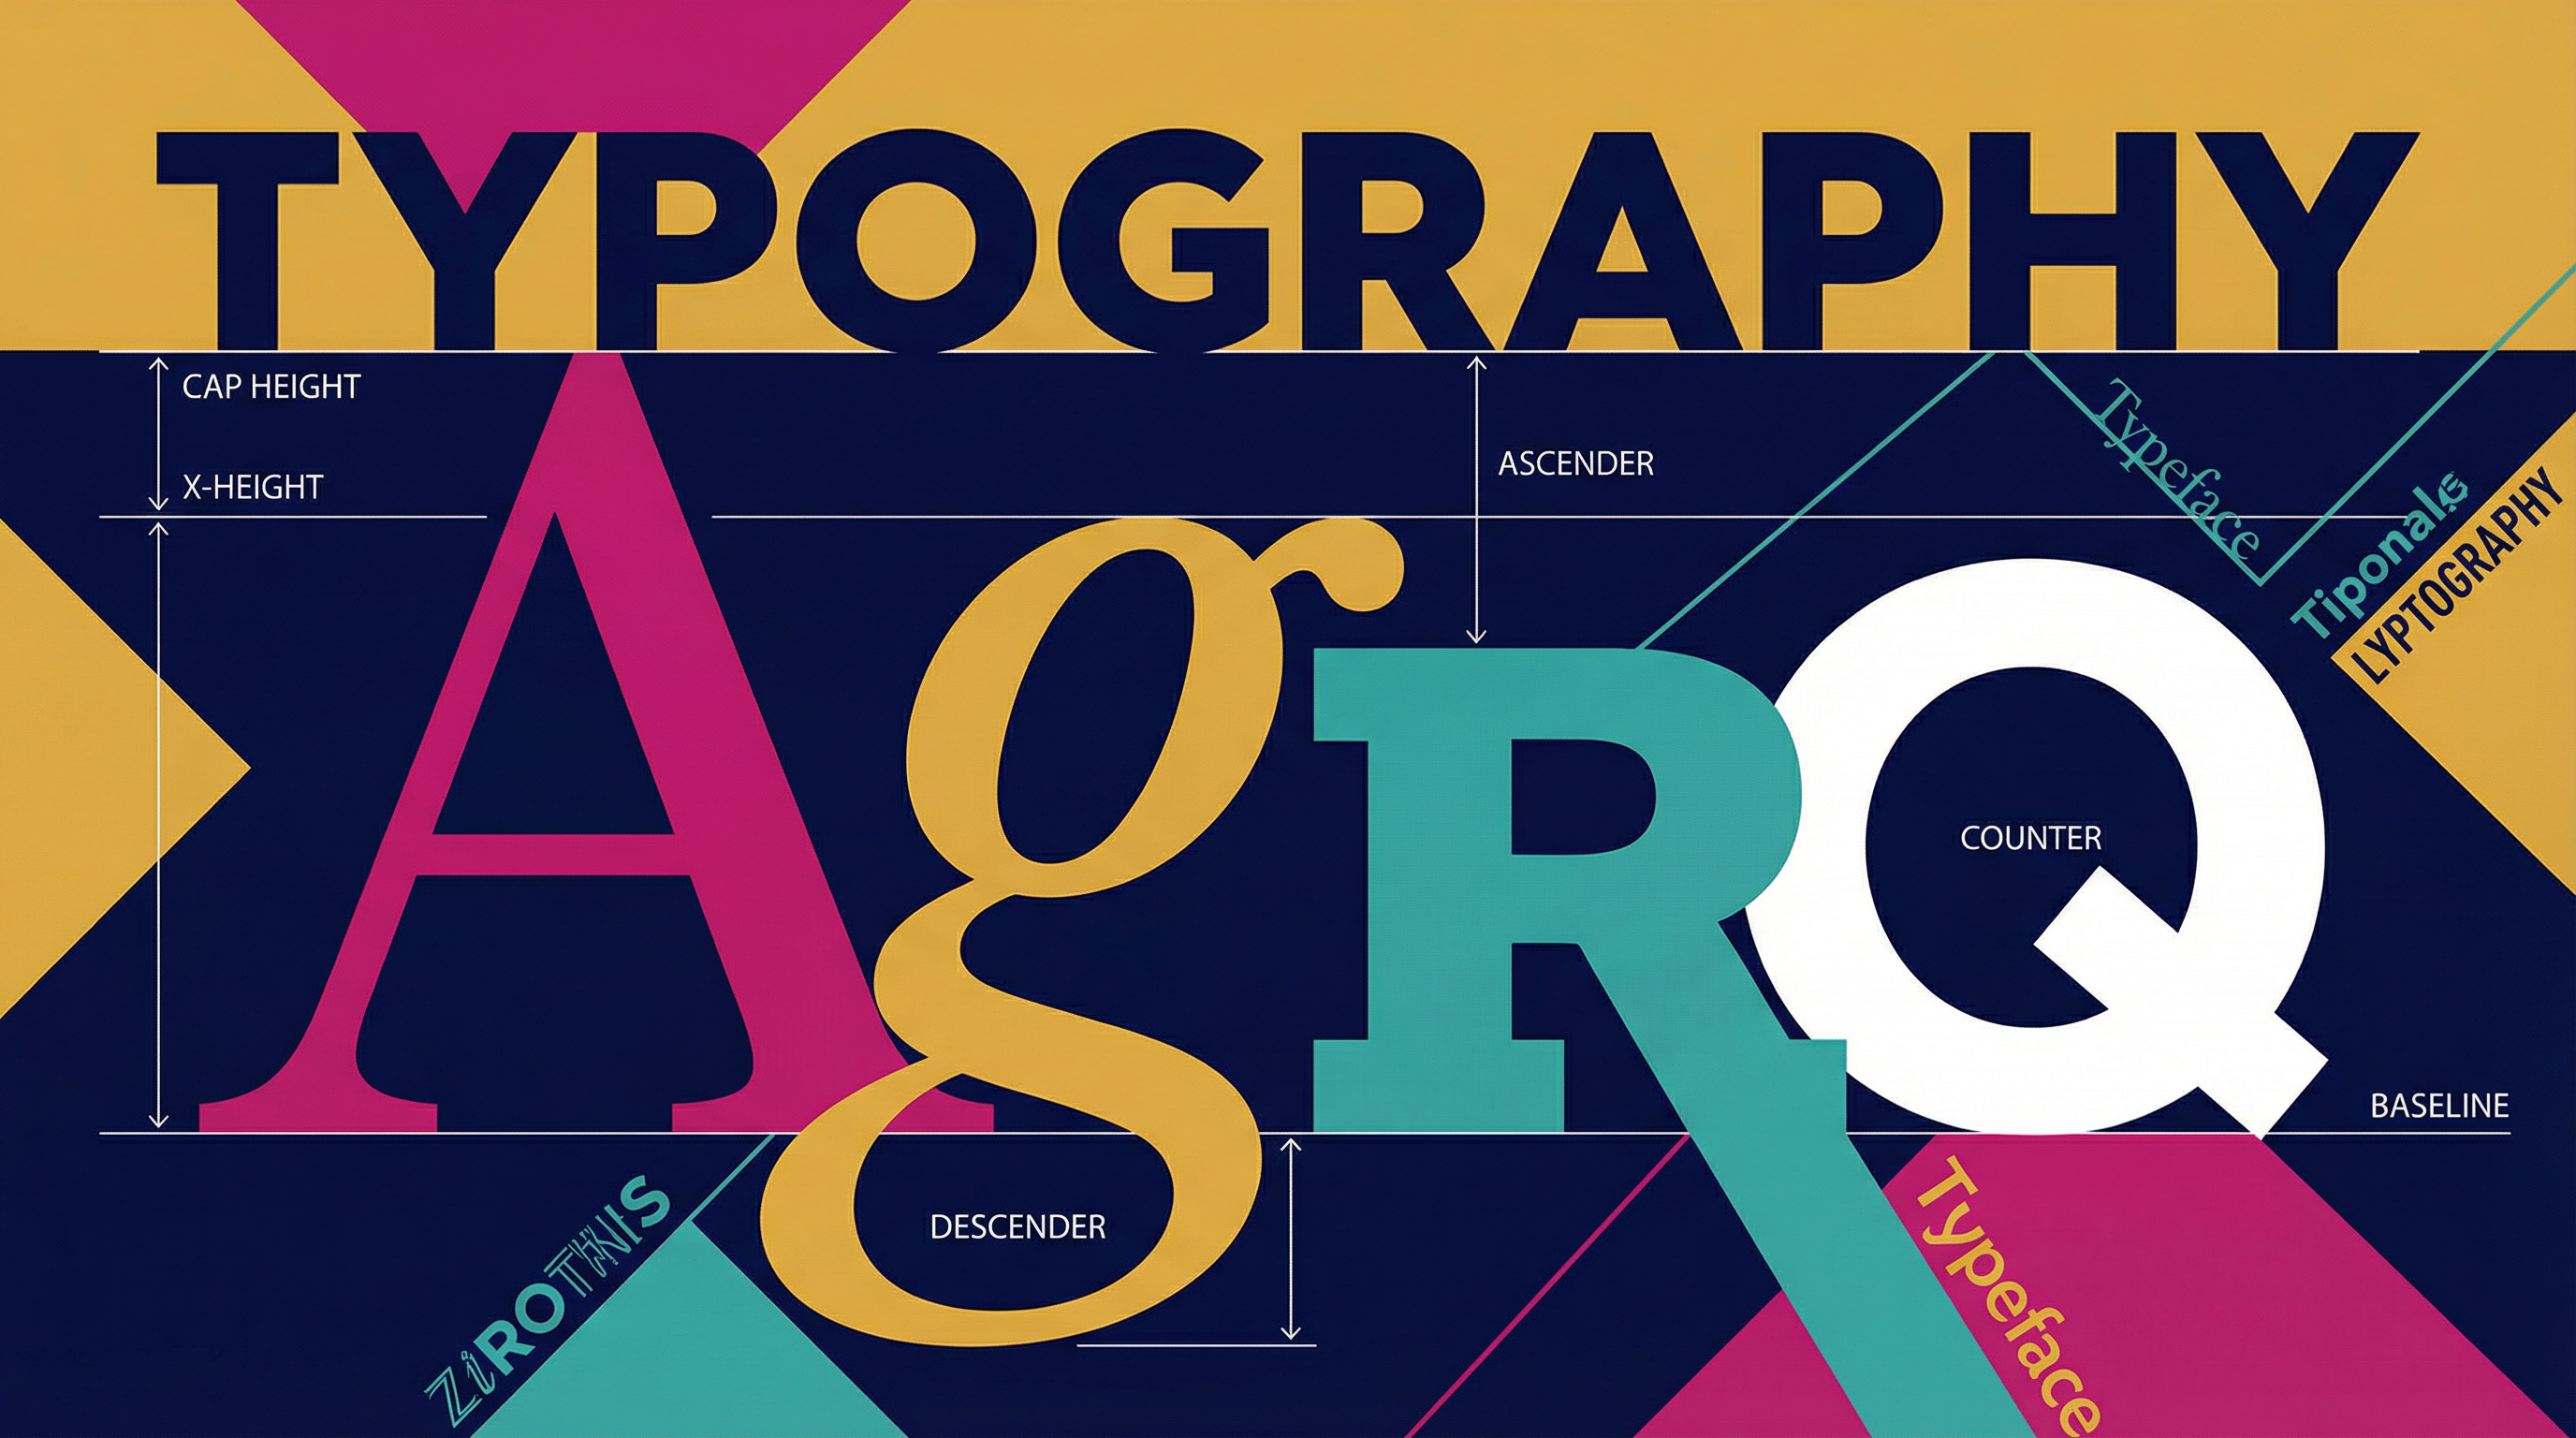
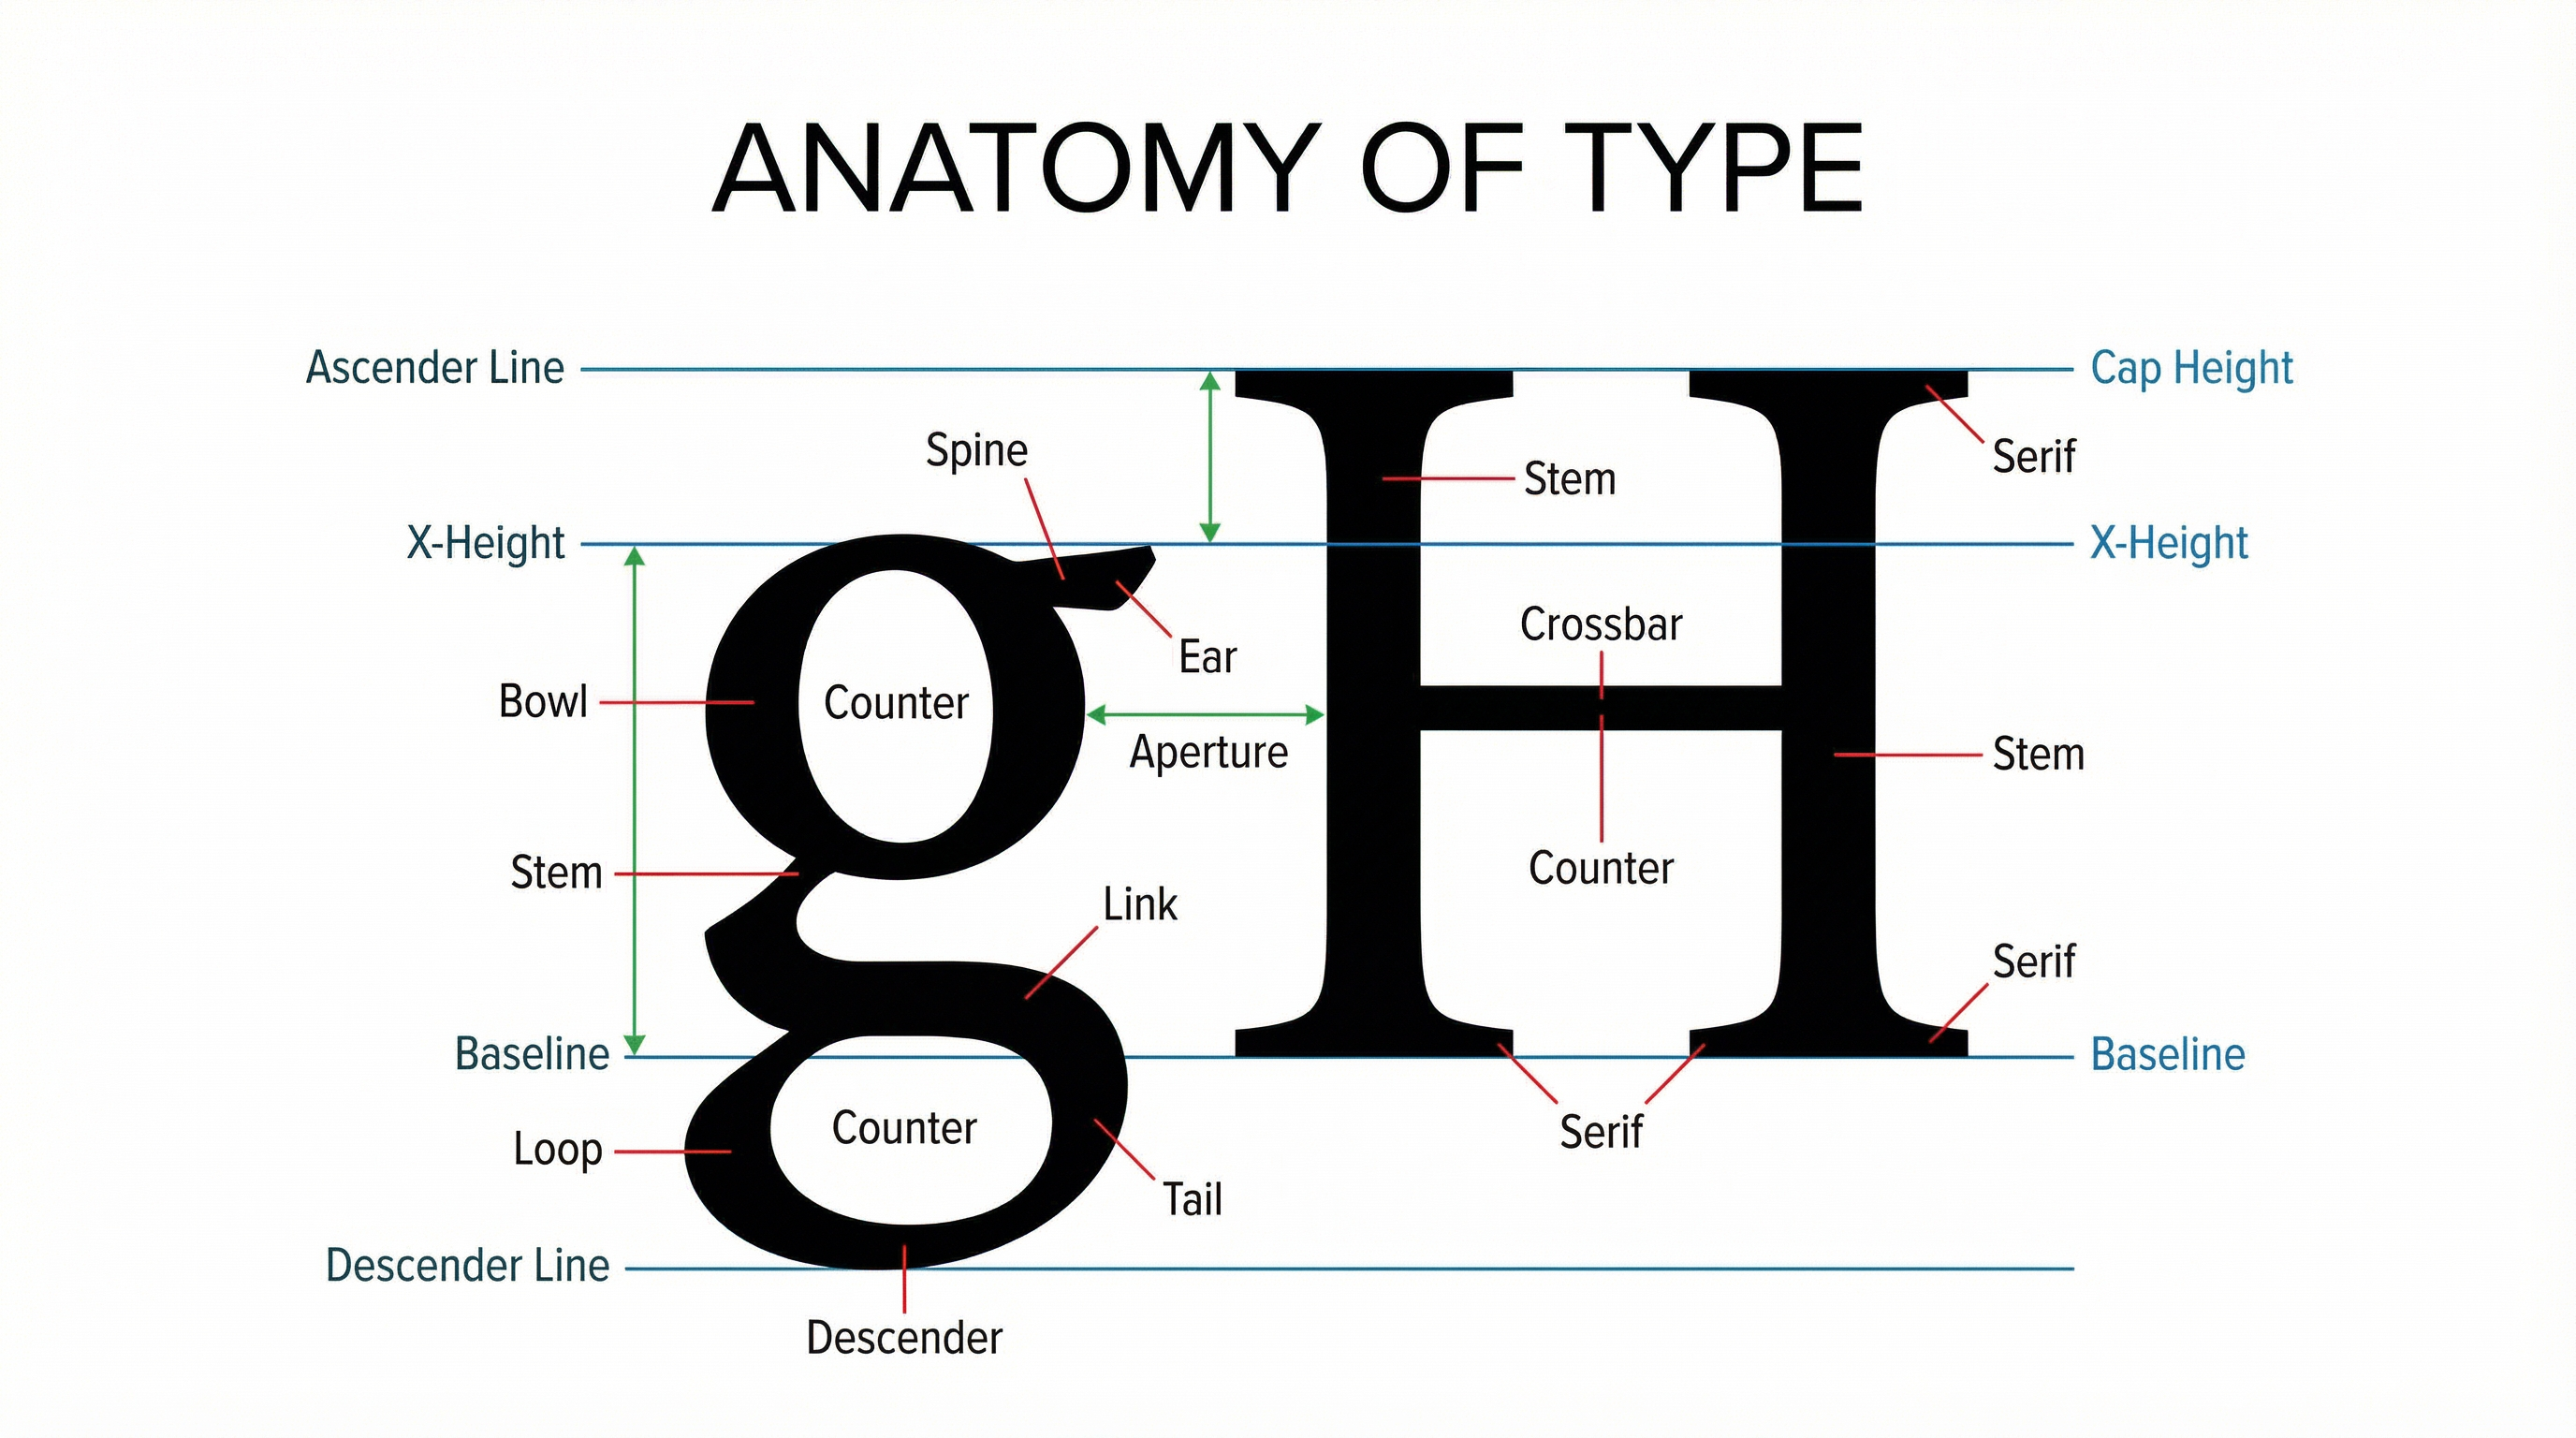
**2. Anatomy of Type:**Examiners will give credit for the precise use of anatomical terms in your portfolio annotations. This demonstrates a deep, technical understanding of letterforms.
**3. Spacing & Layout:**How you control space is as important as the letterforms themselves. This is a key area for demonstrating technical skill (AO2).
- Kerning: The adjustment of space between individual pairs of letters to improve visual harmony. For example, the space between an 'A' and a 'V' often needs to be reduced.
- Tracking: The overall adjustment of letter-spacing across a word, line, or entire block of text.
- Leading (pronounced 'ledding'): The vertical space between lines of text, measured from baseline to baseline. Correct leading is crucial for readability.
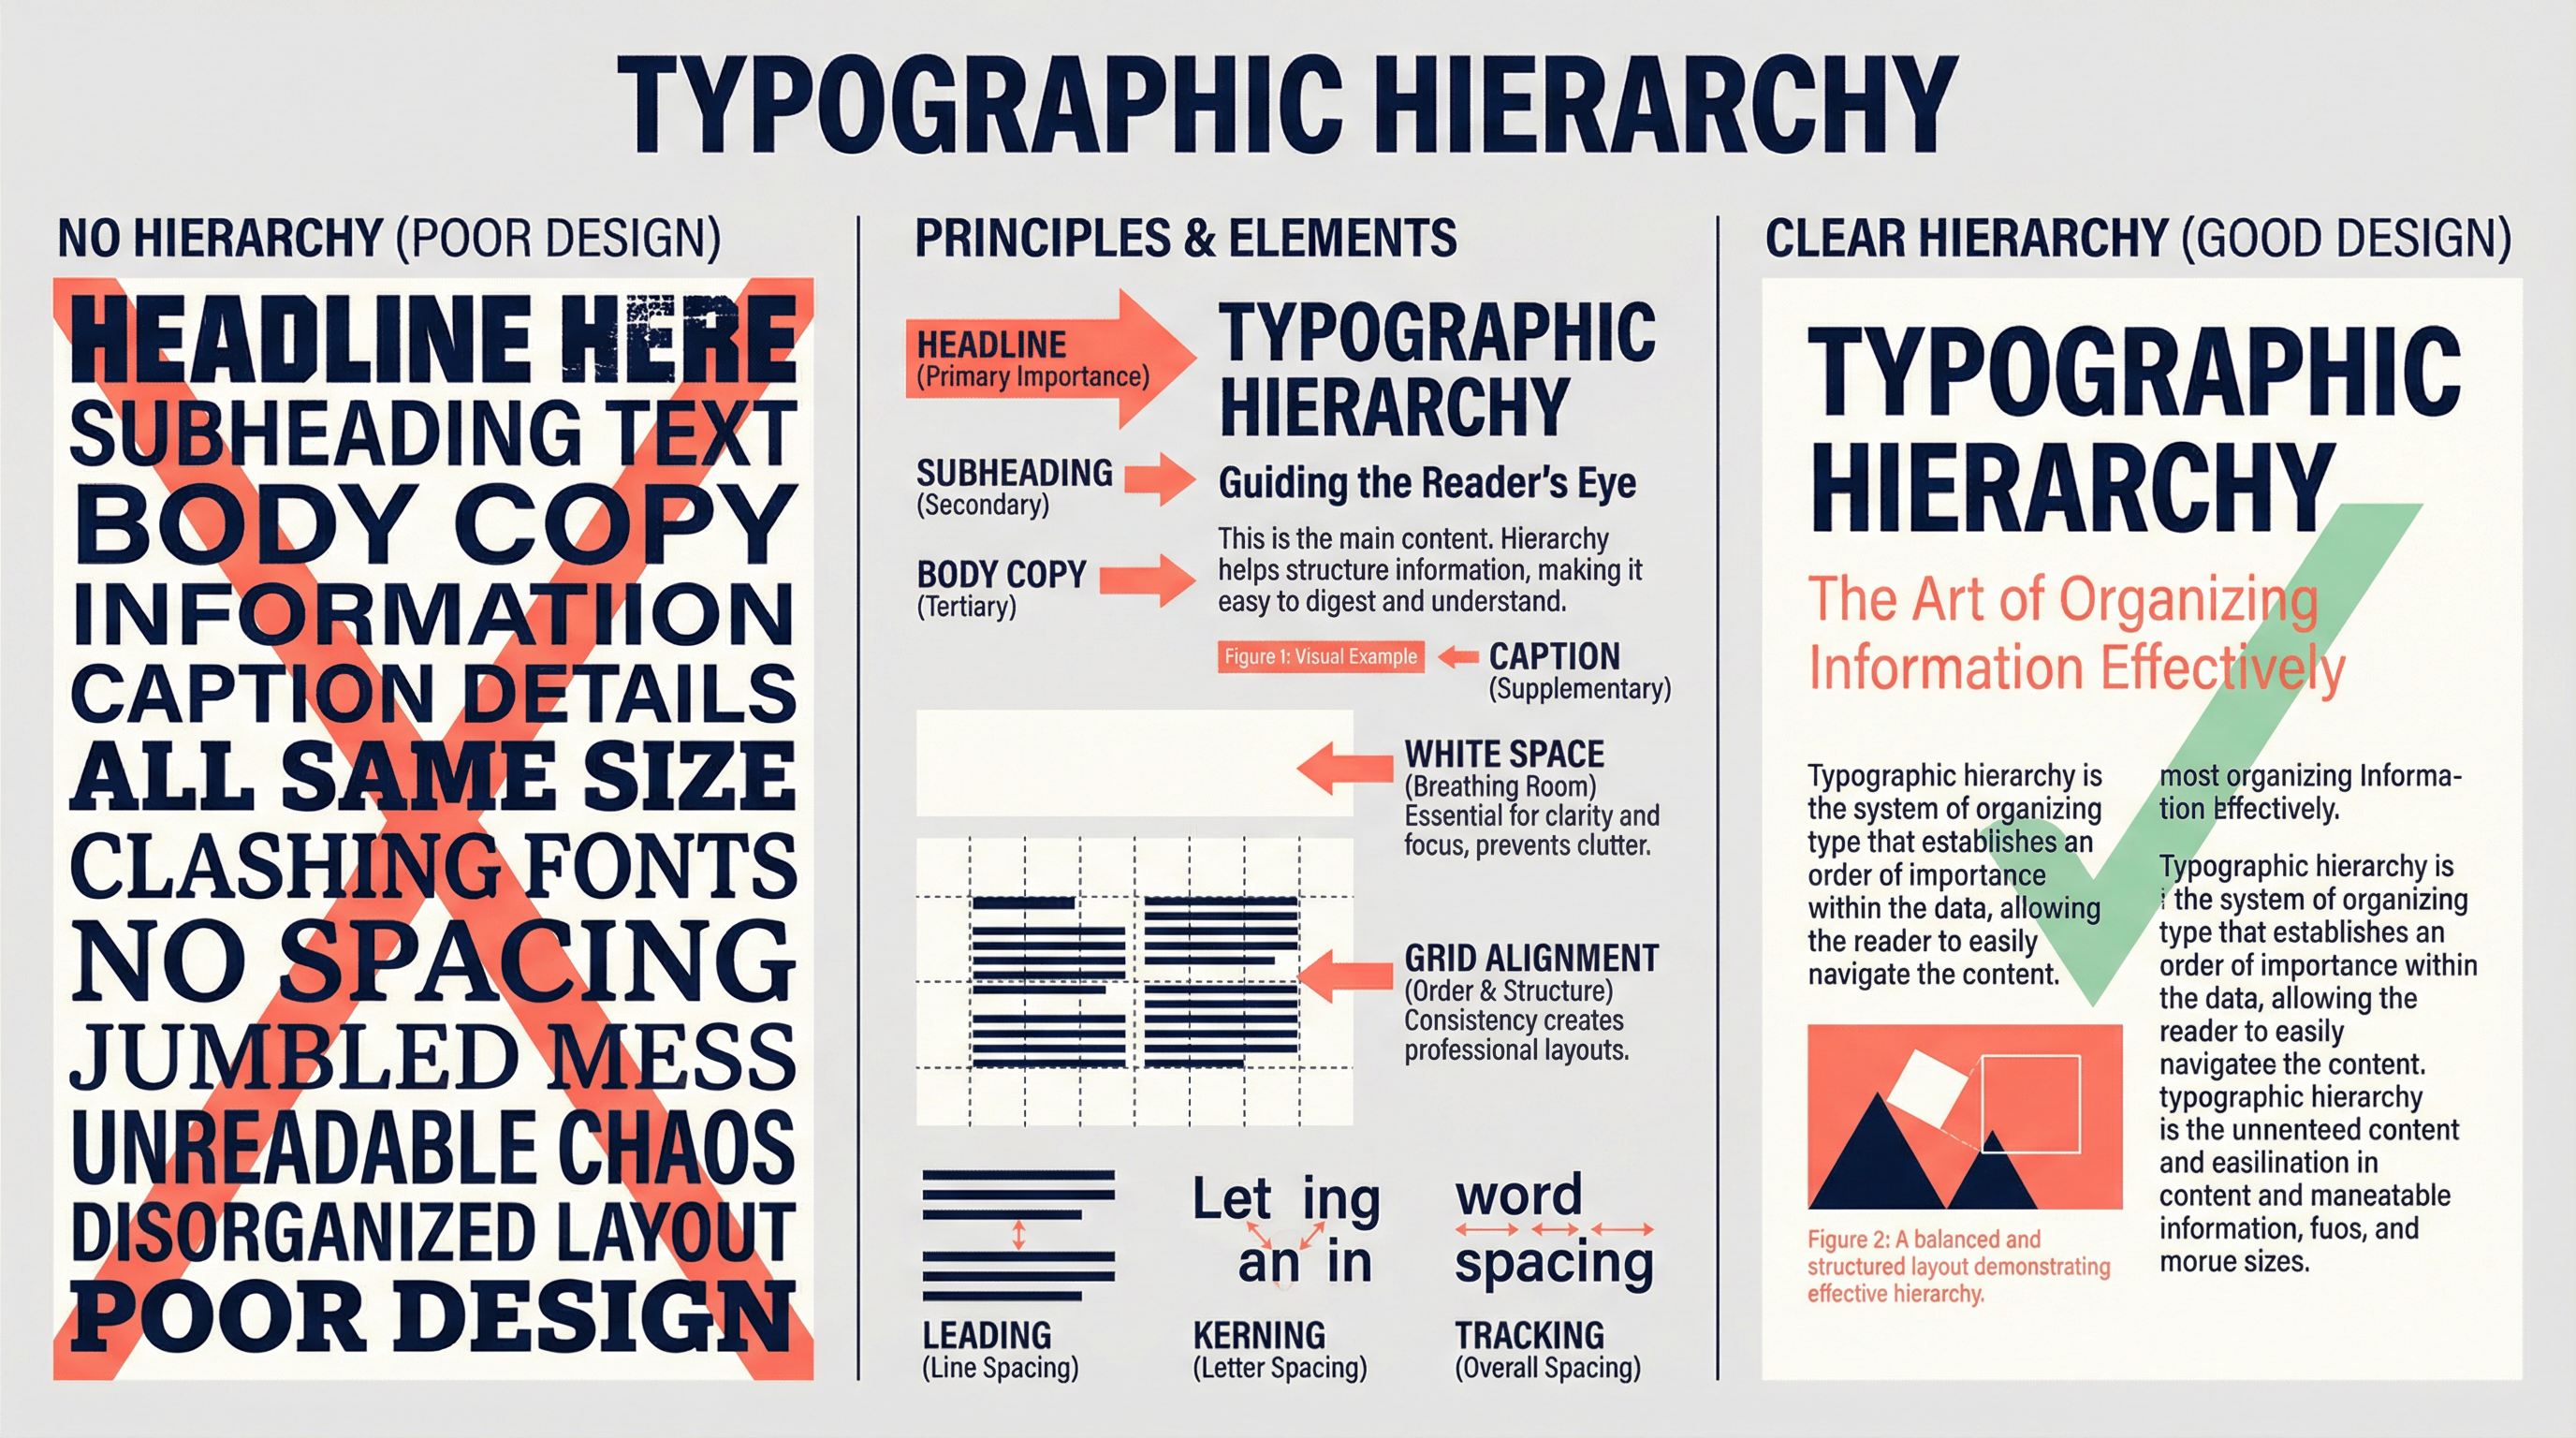
**4. Typographic Hierarchy:**This is the system of organising type to guide the reader's eye. A clear hierarchy ensures the viewer knows what to read first, second, and third. It is achieved by varying size, weight (bold, regular, light), colour, and spacing.
Key Practitioners/Artists/Composers
| Name | Period/Style | Key Works | Relevance |
|---|---|---|---|
| Jan Tschichold | 1920s-60s / Swiss Style | Die Neue Typographie (1928) | Codified the rules of modern typography: asymmetric layouts, sans-serifs, and grid systems. Essential for understanding clean, functional design. |
| David Carson | 1990s / Deconstruction | Ray Gun Magazine | Broke all the rules. Championed expressive, intuitive, and often illegible typography. Crucial for exploring type as image and emotion. |
| The Bauhaus | 1919-1933 / Modernism | Herbert Bayer's Universal Typeface | A school that preached 'form follows function'. Stripped letterforms to their geometric essence. Foundational for any geometric or minimalist work. |
| Neville Brody | 1980s-Present / Postmodernism | The Face Magazine, FUSE | Created bespoke, experimental typefaces and blurred the lines between typography and graphic imagery. A key link between punk, pop culture, and design. |
Technical Vocabulary
- Legibility: The ease with which a reader can distinguish individual letterforms from one another.
- Readability: The ease with which a reader can understand and follow a passage of written text.
- Glyph: An individual character of a font, whether it is a letter, number, punctuation mark, or symbol.
- Vector: A graphic image created using mathematical paths and points, allowing it to be scaled infinitely without losing quality. Essential for digital typography.
- Raster: A graphic image made up of a grid of pixels. Can become pixelated if scaled up.
- Grid System: An underlying framework of intersecting lines used to organise content and create a consistent, orderly layout.
Practical Skills
Techniques & Processes
- Hybrid Techniques: A high-level skill is to combine digital and physical processes. Print your digital type, then physically distress it (fold, tear, burn, scan) and re-digitise it. This creates authentic textures that cannot be replicated with a simple filter and provides excellent evidence for AO2 (Experimentation).
- Vector Manipulation: In software like Adobe Illustrator, go beyond just typing. Convert your text to outlines ('Create Outlines') to manipulate the vector points of each letterform individually. This allows you to customise a font and make it your own.
- Image-Text Integration: Don't just place text on top of an image. Explore how they can interact. Use clipping masks to fill text with an image, or use the text as a window to reveal parts of an image behind it.
Materials & Equipment
- Software: Adobe Illustrator is the industry standard for vector-based typography. Adobe Photoshop is excellent for textural and image-based manipulation. Adobe InDesign is the tool for complex multi-page layouts.
- Sketchbooks: Your sketchbook is your laboratory. Use it to document everything: research, initial ideas, experiments with hand-lettering, printouts of digital work, and detailed, analytical annotations.
- Printing & Scanning: A good quality printer and scanner are essential for creating hybrid media work and for documenting physical experiments for your portfolio.
Portfolio/Coursework Guidance
Assessment Criteria
- AO1 (Develop): Show research into typographic history and practitioners. Analyse their work, don't just describe it. How has it influenced your own ideas?
- AO2 (Experiment): Evidence of experimentation is crucial. Show different typeface choices, layout options, colour palettes. Document your process of refining kerning, tracking, and leading.
- AO3 (Record): Your annotations are vital. Use specialist vocabulary. Explain your decisions. Why did you choose that typeface? How does your layout create a specific mood? Use screenshots of your digital process.
- AO4 (Present): The final outcome must be a personal, meaningful, and coherent response. The typography should be fully integrated and executed with technical skill.
Building a Strong Portfolio
- Document the Invisible: The digital process is often invisible in the final printout. Use screenshots to show your software workspace, including layer panels, tool settings, and vector paths. This is your primary evidence for AO3.
- Show, Don't Tell: Instead of writing 'I experimented with fonts', show a page with the same word in 10 different fonts, with annotations explaining your thoughts on each.
- Refine, Refine, Refine: Show the development of an idea. A first draft, a second version with improvements based on analysis, and a final, polished piece. This demonstrates a journey of refinement, which is key to AO2.
Exam Component
Written Exam Knowledge
While Art and Design is primarily practical, your portfolio annotations and any accompanying written evaluation are where you demonstrate theoretical knowledge. You must be able to articulate the 'why' behind your design choices, linking them to contextual research (AO1) and technical understanding.
Practical Exam Preparation
For the Externally Set Task (the timed exam), you will have a preparatory period. Use this time to:
- Deconstruct the Brief: Identify keywords and themes. How can typography be used to explore these themes?
- Focused Research: Find artists and designers whose work on typography relates directly to the brief.
- Rapid Experimentation: Use the prep period to test out multiple typographic ideas. Don't settle on your first thought. Explore hand-drawn, digital, and hybrid approaches.
- Plan for the 10 Hours: Go into the timed session with a clear plan. You should be executing a refined idea, not starting from scratch. Your plan should include how you will manage your time to complete the final piece."