Study Notes
Overview
Welcome to the study of Mixed Media, a dynamic and expressive area within Art and Design where candidates are encouraged to break boundaries and combine materials in innovative ways. This topic is not merely about collage; it is a sophisticated investigation into how distinct media, materials, and techniques can be purposefully integrated to generate a complex visual language. Success in this area hinges on demonstrating a deep understanding of the interaction between layers, textures, and surfaces, moving beyond superficial application to achieve a structural and conceptual synthesis in your work. This guide will equip you with the theoretical knowledge, practical skills, and exam strategies needed to excel.
Key Knowledge & Theory
Core Concepts
Theoretical understanding underpins all successful practical work in Art and Design. For Mixed Media, candidates must grasp several core concepts. Integration is paramount; this refers to the seamless and meaningful combination of different materials, where the final outcome is more than the sum of its parts. Substrate choice is a critical decision; the surface you work on (e.g., heavyweight paper, mount board, canvas, wood) must be able to support the various media you apply. Materiality is the exploration of the physical qualities of your chosen media – their texture, weight, transparency, and how they interact. For instance, the tension created by combining incompatible media, such as oil-based and water-based materials, can be a powerful expressive tool. Finally, Conceptual Intent is the driving idea behind your work. Every material and technique you use should serve to strengthen and communicate your theme.
Key Practitioners/Artists/Composers
| Name | Period/Style | Key Works | Relevance |
|---|---|---|---|
| Robert Rauschenberg | (1925-2008) American Pop Art / Neo-Dada | Combines (e.g., Bed, 1955; Monogram, 1955-59) | Pioneered the integration of everyday objects (found objects) and painting, blurring the lines between painting and sculpture. His work is essential for understanding how to use real-world items to create abstract and narrative meaning. |
| Kurt Schwitters | (1887-1948) German Dada / Constructivism | Merz series (e.g., Merzbau) | Famous for creating collages and assemblages from discarded, everyday materials like tickets, packaging, and wood scraps. His methodology demonstrates that any material can be elevated to art through artistic intention and composition. |
| Hannah Höch | (1889-1978) German Dada | Cut with the Kitchen Knife... (1919-20) | A pioneer of photomontage, she deconstructed and reassembled photographic images to create sharp, satirical commentaries on society. Her work is a key reference for using found imagery in a critical and conceptual way. |
| Joseph Cornell | (1903-1972) American Surrealism / Assemblage | Untitled (Penny Arcade Portrait of Lauren Bacall) (1946) | Created poetic, box-like assemblages filled with found objects, photographs, and ephemera. His work shows how mixed media can be used to create self-contained narrative worlds and evoke nostalgia and memory. |
Technical Vocabulary
Using precise terminology is crucial for high-level annotation (AO3) and written responses. Examiners look for candidates who can articulate their process with the language of the discipline.
- Assemblage: A three-dimensional artwork made from combining found objects.
- Collage: An artwork made from an assemblage of different forms, thus creating a new whole. Often, collages are made from paper, but other materials may be included.
- Substrate: The base surface on which an artwork is created (e.g., paper, canvas, board).
- Ground: A primer or preparatory layer applied to the substrate to prepare it for painting or other media (e.g., Gesso).
- Impasto: A technique where paint is laid on a surface in very thick layers, usually thick enough that the brush or painting-knife strokes are visible.
- Frottage: A technique of creating a design by rubbing over an object through a sheet of paper with a pencil or other drawing material.
- Juxtaposition: The placement of two or more things side by side, often to create a contrasting effect.
- Layering: The process of building up surfaces by applying media on top of one another. In mixed media, this is key to creating depth and complexity.
- Translucency/Opacity: The degree to which a material allows light to pass through it. The interplay between translucent and opaque layers is a core mixed media strategy.
Practical Skills
Techniques & Processes
Mastering a range of techniques is essential for earning marks in AO2 (Experimentation). Your sketchbook should be a record of you testing, refining, and mastering these processes.
1. Wax Resist:
- Process: Apply wax (from a candle, oil pastel, or wax crayon) to your substrate. The wax acts as a barrier.
- Application: Paint over the surface with a water-based medium like watercolour or ink. The paint will be repelled by the wax, creating a broken, textural effect.
- Examiner Tip: This is a classic example of using incompatible media. Annotate how this effect enhances your conceptual ideas (e.g., creating a sense of fragmented memory or decayed surfaces).
2. Image Transfer:
- Process: Print an image using a laser printer (inkjet will not work). Coat the image with an acrylic gel medium. Press it face down onto your chosen surface and allow it to dry completely. Once dry, use a damp sponge to gently rub away the paper, leaving the ink transferred to the new surface.
- Application: Creates ghostly, semi-transparent images that can be layered with other media. Excellent for themes of history, memory, or identity.
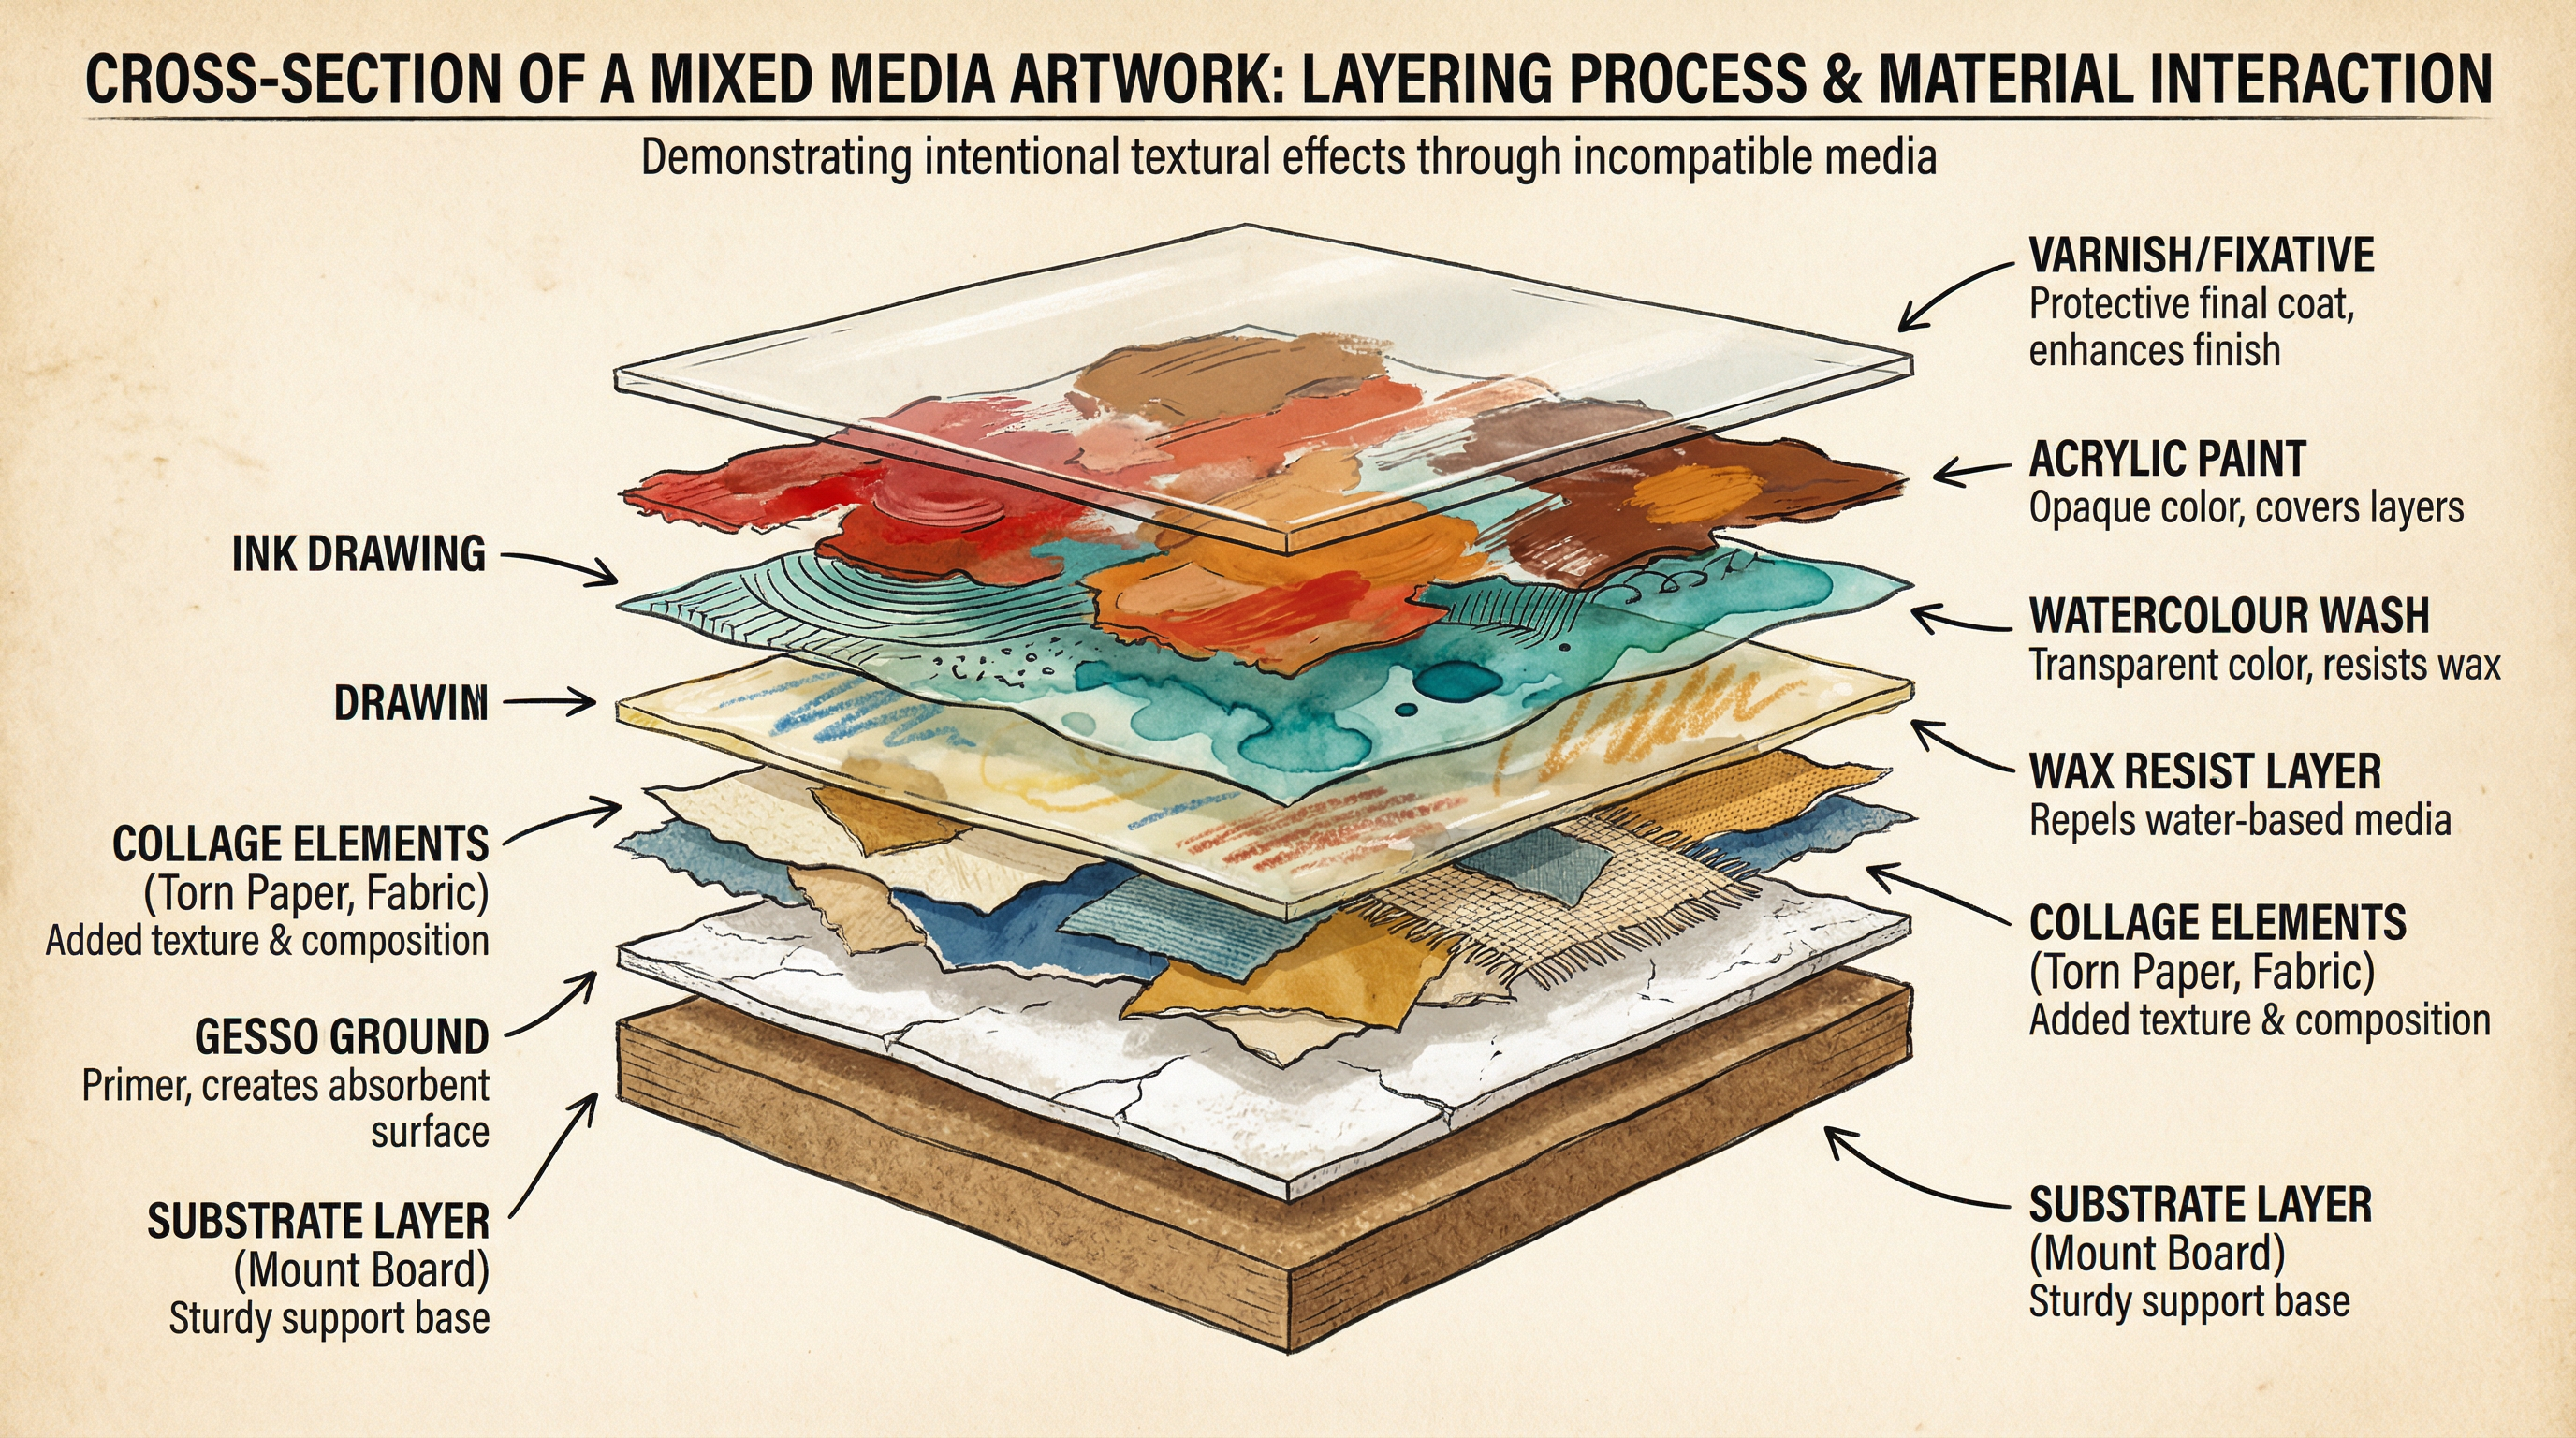
3. Layering with Collage and Paint:
- Process: Begin by adhering collage elements (e.g., torn paper, fabric, photographs) to your gessoed substrate using a suitable adhesive like PVA or acrylic medium.
- Integration: Once dry, work over the collage with other media. A translucent wash of watercolour can tint the collage elements, while opaque acrylic can obscure parts, creating a sense of history and depth.
- Documentation: Photograph each distinct layer before you cover it. This is critical evidence for AO3.
Materials & Equipment
Your choice of materials is a key part of your artistic expression. Always consider safety and suitability.
| Material/Equipment | Use | Safety/Technical Notes |
|---|---|---|
| Substrates | Mount Board, MDF, Plywood, Heavyweight Watercolour Paper (300gsm+) | Cartridge paper is generally too flimsy and will buckle under wet media. Choose a substrate that can withstand heavy application and potential scratching or sanding. |
| Adhesives | PVA Glue, Acrylic Medium (Matte/Gloss), Mod Podge, Spray Mount | Test adhesives for strength and finish. PVA can sometimes dry with a slight sheen. Matte medium is an excellent all-purpose adhesive and sealant. Use spray mount only in a well-ventilated area. |
| Primers | Gesso | Applying a gesso ground creates a consistent, absorbent surface, improving adhesion and preventing media from soaking into the substrate and causing degradation. |
| Drawing Media | Charcoal, Graphite, Ink, Oil Pastels | Can be used for initial drawing, for mark-making over layers, or as a resist. Can be fixed with a spray fixative to prevent smudging. |
| Paints | Acrylic, Watercolour, Gouache, Inks | Understand their properties: acrylic is opaque and permanent; watercolour is transparent; gouache is opaque but can be reactivated with water. |
| Found Objects | Fabric, Sand, Wire, Plastic, Wood, Metal | Ensure objects are securely attached. Consider the weight and how it will affect the substrate. Adhesion can be a challenge; a strong glue gun or epoxy may be needed for heavier 3D elements. |
Portfolio/Coursework Guidance
Assessment Criteria
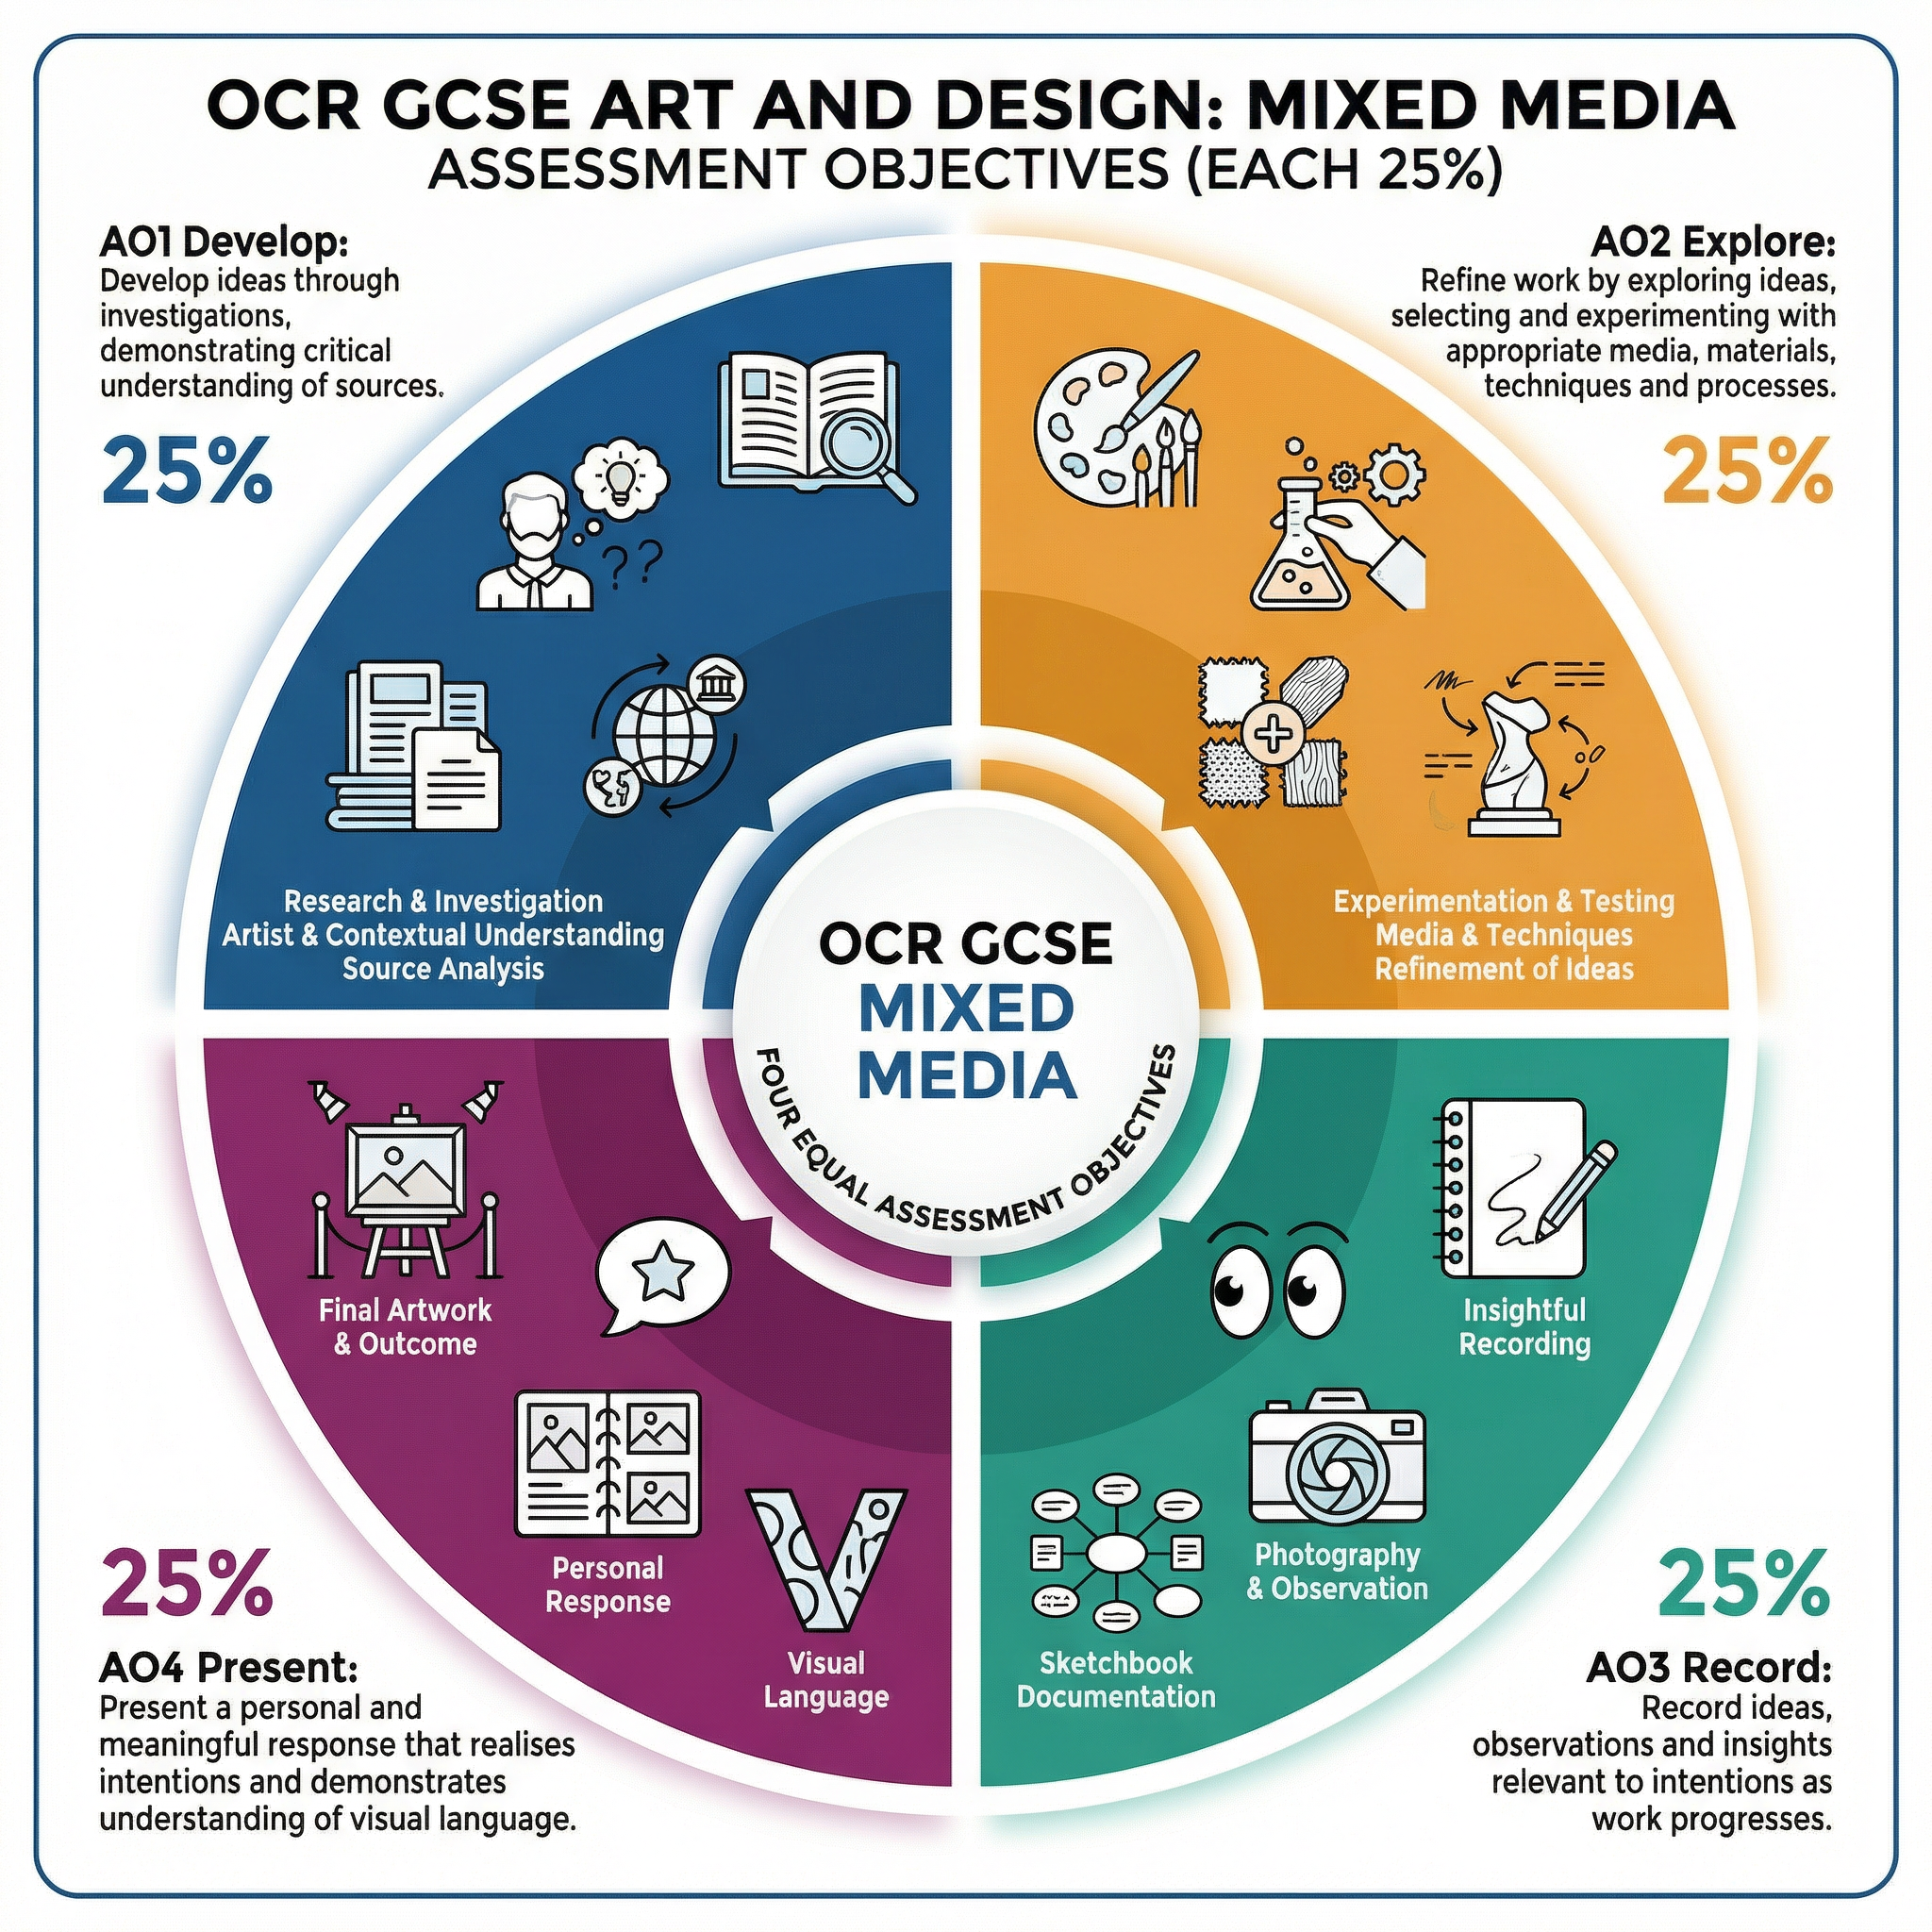
Your portfolio is assessed against four equally weighted Assessment Objectives (AOs). You must provide evidence for all four.
- AO1: Develop (25%): Show your research into artists. Don't just include pictures of their work; analyse their methods and explain how they have influenced your own ideas.
- AO2: Explore (25%): This is your experimentation. Your sketchbook should be full of tests with different materials, compositions, and techniques. Show both successes and failures, and explain what you learned from each.
- AO3: Record (25%): Document your process through drawing, photography, and annotation. Your annotations must be reflective and analytical, not just descriptive. Use technical vocabulary.
- AO4: Present (25%): Your final outcome. This should be a personal, meaningful, and coherent piece that is the culmination of all your research and experimentation.
Building a Strong Portfolio
- Tell a Story: Your portfolio should show a clear journey from initial idea to final piece. Each page should logically follow the last.
- Annotate Everything: Explain your thinking. Why did you choose that artist? Why did you use that material? What were you trying to achieve with that composition? Assume the examiner knows nothing about your project.
- Quality over Quantity: A few well-developed ideas are better than many superficial ones. Show depth of investigation.
- Refine and Develop: Show how your ideas have changed and improved over time. Don't be afraid to show dead ends, as long as you explain why you moved on from them. This is evidence of critical thinking.
- Link Everything: Your practical work should be clearly linked to your artist research. Your final piece should be a clear development from your experiments. Create a cohesive project.
Exam Component
Written Exam Knowledge
While Art and Design is primarily practical, your portfolio annotations and potential written exam component require theoretical knowledge. You must be able to write about your own work and the work of others using critical language. This involves analysing and evaluating art, explaining how meaning is communicated through the use of formal elements (line, tone, colour, shape, etc.) and the choice of media.
Practical Exam Preparation
For the Externally Set Task, you will have a preparatory period to research and experiment, followed by a timed exam (e.g., 10 hours) to create your final outcome.
- Time Management: Plan your 10 hours carefully. Allocate time for preparation, execution of main elements, refinement, and drying time.
- Preparation is Key: Do as much as you can during the prep period. Test all your materials, finalise your composition, and prepare your substrates. You should walk into the exam knowing exactly what you are going to do.
- Work Smart: If a layer needs to dry, work on another part of the piece. Have multiple elements on the go.
- Don't Take Unnecessary Risks: The timed exam is not the place to try a brand new, untested technique for the first time. Rely on the processes you have already mastered during your prep work.