Study Notes
Overview
Photography within the OCR GCSE Art and Design specification is a practical endorsement where candidates are expected to develop a personal project from initial concept to final resolution. This involves not just taking photographs, but demonstrating a deep understanding of the creative process. Candidates must show evidence of research, experimentation with techniques, recording of ideas, and the presentation of a personal and meaningful outcome. Marks are awarded for the entire journey, not just the final pictures. This area of study allows for immense creativity, enabling students to explore themes and ideas through lens-based media, whether digital, analogue, or a combination of both.
Key Knowledge & Theory
Core Concepts
The theoretical foundation of photography rests on understanding how a camera works and how to control it to achieve a specific creative vision. The most critical concept is the Exposure Triangle, which is the relationship between Aperture, Shutter Speed, and ISO. Mastering this balance is non-negotiable for earning marks related to technical skill.
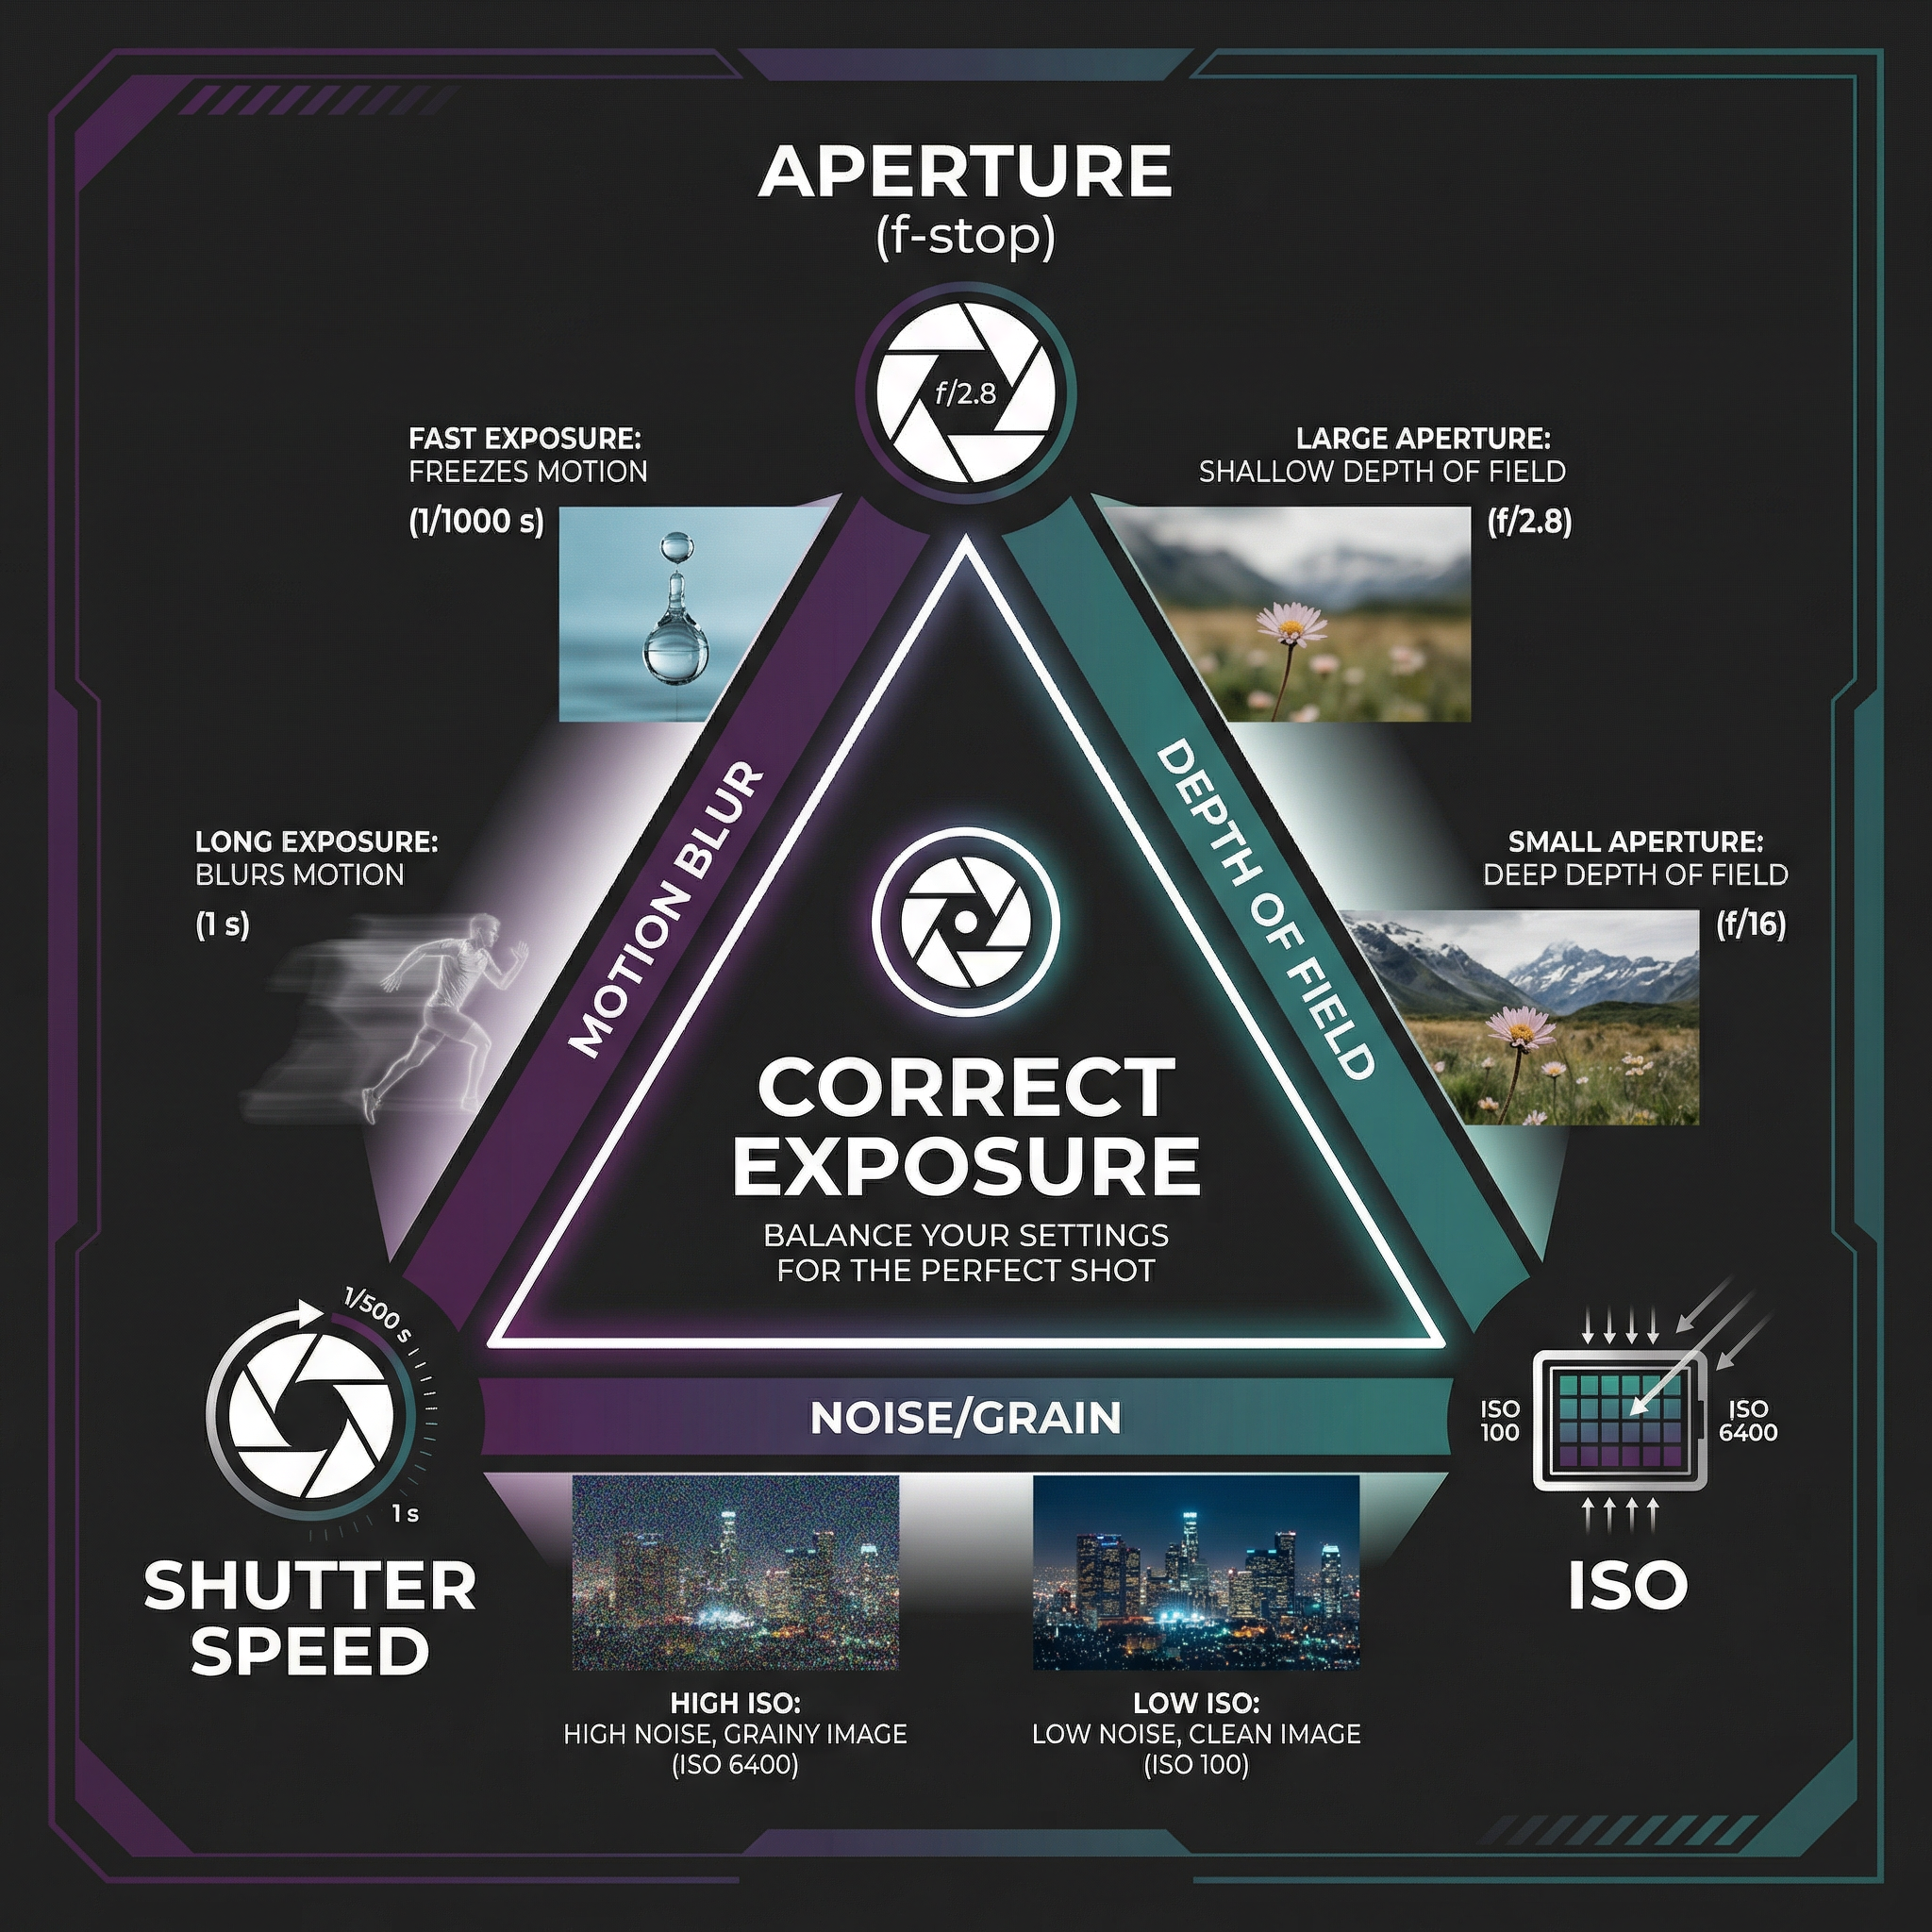
- Aperture (f-stop): This is the opening in the lens that controls how much light enters the camera. It also dictates the depth of field (DoF) — the area of the image that is in sharp focus. A wide aperture (e.g., f/1.8) creates a shallow DoF, blurring the background and isolating the subject. A narrow aperture (e.g., f/16) creates a deep DoF, keeping the entire scene sharp, which is ideal for landscapes.
- Shutter Speed: This is the length of time the camera's sensor is exposed to light. A fast shutter speed (e.g., 1/1000s) freezes motion, while a slow shutter speed (e.g., 1s) creates motion blur, useful for capturing light trails or silky water effects.
- ISO: This refers to the sensor's sensitivity to light. A low ISO (e.g., 100) produces a clean, high-quality image. A high ISO (e.g., 3200) is used in low-light situations but can introduce unwanted digital 'noise' or grain.
Beyond exposure, a strong understanding of Composition is vital. Examiners look for considered use of compositional rules to guide the viewer's eye and create impact. Key techniques include the Rule of Thirds, Leading Lines, Framing, Viewpoint, and the use of Negative Space.
Key Practitioners/Artists/Composers
| Name | Period/Style | Key Works | Relevance |
|---|---|---|---|
| Cindy Sherman | Contemporary, Conceptual Portraiture | "Untitled Film Stills" (1977-80) | Explores identity, stereotypes, and the constructed nature of images. Essential for projects on self-portraiture or representation. |
| Henri Cartier-Bresson | 20th Century, Street/Documentary | "Behind the Gare Saint-Lazare" (1932) | Coined the term "The Decisive Moment". A master of composition and capturing fleeting moments. Crucial for street or documentary work. |
| Don McCullin | 20th Century, Photojournalism | "Shell-Shocked US Marine" (1968) | Renowned for his powerful and often harrowing war photography. His work raises ethical questions and is vital for social documentary projects. |
| Rineke Dijkstra | Contemporary, Portraiture | "Beach Portraits" (1992-94) | Known for her stark, honest portraits of adolescents and people in transition. Her work informs projects on identity, vulnerability, and the gaze. |
Technical Vocabulary
Using precise terminology in annotations (AO3) and any written component is crucial for demonstrating understanding. Candidates should be fluent in the following terms:
- Aperture: The opening of a lens's diaphragm through which light passes.
- Shutter Speed: The duration for which the camera shutter is open.
- ISO: The sensitivity of the image sensor.
- Depth of Field (DoF): The distance between the nearest and the furthest objects that are in acceptably sharp focus.
- Bokeh: The aesthetic quality of the blur produced in the out-of-focus parts of an image produced by a lens.
- Composition: The arrangement of elements within the frame of the photograph.
- Contact Sheet: A print of all the frames from a roll of film or digital folder, used for selection.
- Dodging & Burning: A darkroom or digital technique to selectively lighten (dodge) or darken (burn) parts of an image.
- Photogram: A cameraless image made by placing objects directly onto light-sensitive material.
Practical Skills
Techniques & Processes
Candidates must show evidence of experimentation (AO2). This means trying, testing, and refining different techniques. Key processes include:
- Digital Workflow: Shooting in RAW format to capture maximum data. Importing images into software like Adobe Lightroom for organisation and initial edits. Using Adobe Photoshop for detailed manipulation, including layers, masks, and adjustment layers (Curves, Levels, Hue/Saturation). Exporting for print or web.
- Darkroom Workflow: Processing black and white film. Making contact sheets to review negatives. Creating test strips to determine correct exposure time for a print. Making an enlargement, using dodging and burning to refine the tones.
- Alternative Processes: Experimenting with techniques like cyanotypes, pinhole photography, or creating photograms. These demonstrate a broader engagement with the medium.
- Studio Lighting: Using studio strobes, softboxes, and reflectors to control light and shadow. Creating lighting diagrams in your sketchbook is excellent evidence for AO3.
Materials & Equipment
Understanding the tools of the trade is fundamental. Candidates should demonstrate competence with:
- Cameras: DSLR, Mirrorless, or Film SLR cameras, understanding the manual controls.
- Lenses: Using different focal lengths (e.g., 50mm prime, 24-70mm zoom) for different effects.
- Tripods: Essential for long exposures, low-light work, and ensuring sharpness.
- Darkroom: Enlarger, developing trays, chemicals (developer, stop bath, fixer), safelight.
- Digital Software: Adobe Photoshop and/or Lightroom.
Portfolio/Coursework Guidance
Assessment Criteria
Your entire project is marked against four equally weighted Assessment Objectives (AOs). Understanding these is the key to a high grade.
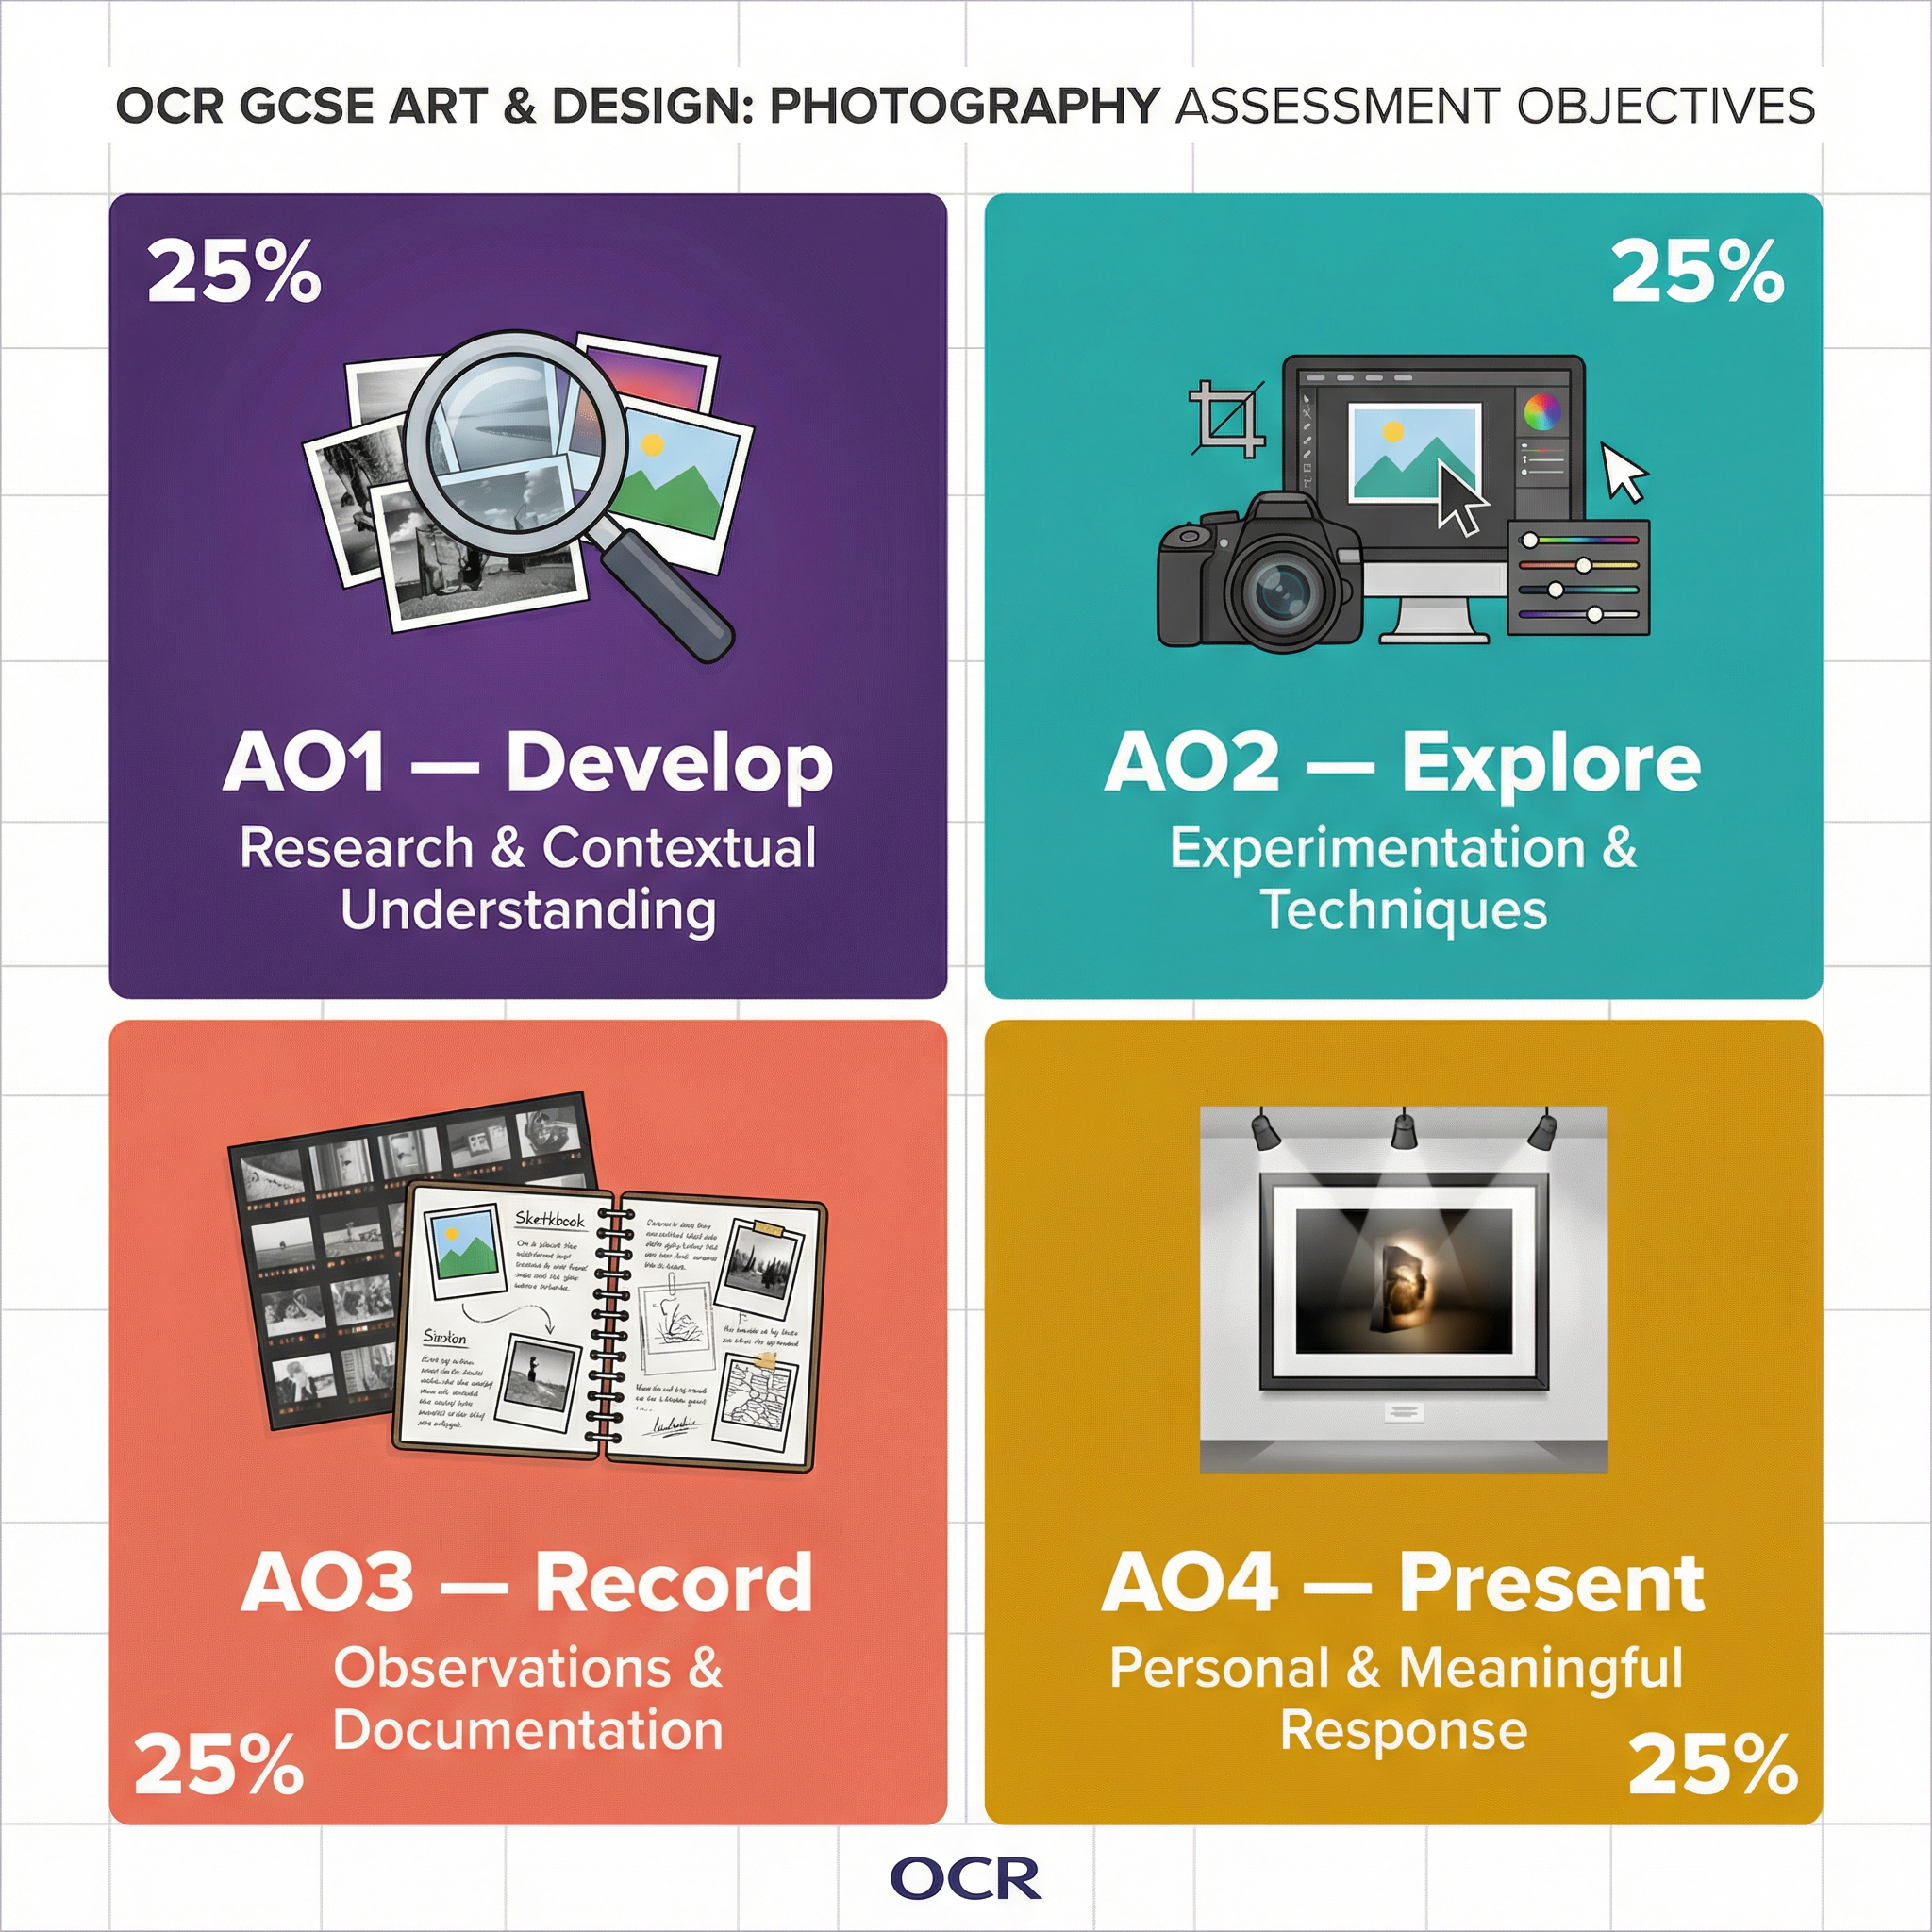
- AO1: Develop (25%): Researching artists, developing ideas, and making connections to your own work.
- AO2: Explore (25%): Experimenting with media, materials, techniques, and processes.
- AO3: Record (25%): Recording observations, ideas, and your creative journey through annotation, drawings, and contact sheets.
- AO4: Present (25%): Presenting a personal, informed, and meaningful final outcome that connects to all your preparatory work.
Building a Strong Portfolio
Your portfolio (often a sketchbook or series of digital boards) is the evidence of your learning journey. It must tell a story.
- Mind Maps & Initial Ideas: Start with brainstorming your theme. Show your thinking.
- Artist Research: Don't just paste in pictures. Analyse specific images. How did the artist use light? Composition? What is their concept? Then, write a paragraph explaining how this will influence YOUR next shoot.
- Documented Shoots: Include contact sheets for every shoot. Annotate them. Explain why you selected certain images and rejected others. This is critical for AO3.
- Show Experimentation: Did you try different apertures? Different lighting? Different editing styles? Show the results side-by-side and explain what you learned.
- Refinement: Show how your ideas developed. Link back to your artist research. Explain how your experiments led you to your final idea.
- Final Outcome: Your final piece(s) should be the logical conclusion of your journey. It should be technically proficient and conceptually resolved.
Exam Component
Written Exam Knowledge
While Photography is a coursework-based subject, the principles learned are essential for the Externally Set Assignment. You will be given a theme or starting point by the exam board and will have a set amount of prep time to build a project, culminating in a final outcome produced under timed conditions. All the knowledge about AOs, artists, and techniques applies here. You must be able to write a Statement of Intent explaining your ideas.
Practical Exam Preparation
Success in the timed element (often 10 hours) relies on excellent preparation.
- Have a Clear Plan: By the time the exam starts, you should know exactly what you are going to do. Have your final shoot planned, or your final print/digital manipulation process mapped out.
- Prepare Your Assets: Have your selected images edited and ready. Have any materials you need prepared.
- Practice Under Timed Conditions: Do a mock run. Can you produce your intended outcome in the time allowed?
- Don't Overcomplicate: The timed session is for execution, not major new experimentation. Keep it focused.