Study Notes
Overview
Printmaking is a versatile and powerful area of Art and Design, allowing for the creation of multiples and offering a rich history of technical innovation and conceptual depth. For OCR GCSE candidates, it provides a fantastic opportunity to demonstrate a wide range of skills across all four Assessment Objectives (AOs). This guide will break down the core knowledge and practical skills you need to excel, from understanding the fundamental differences between relief, intaglio, and planographic processes to building a portfolio that evidences a sophisticated and personal creative journey.
Key Knowledge & Theory
Core Concepts
Understanding the theoretical basis of printmaking is crucial for earning marks in AO1. Candidates must be able to articulate the principles behind the main printmaking families. This is not just about knowing the steps, but understanding why they work and what visual qualities they produce.
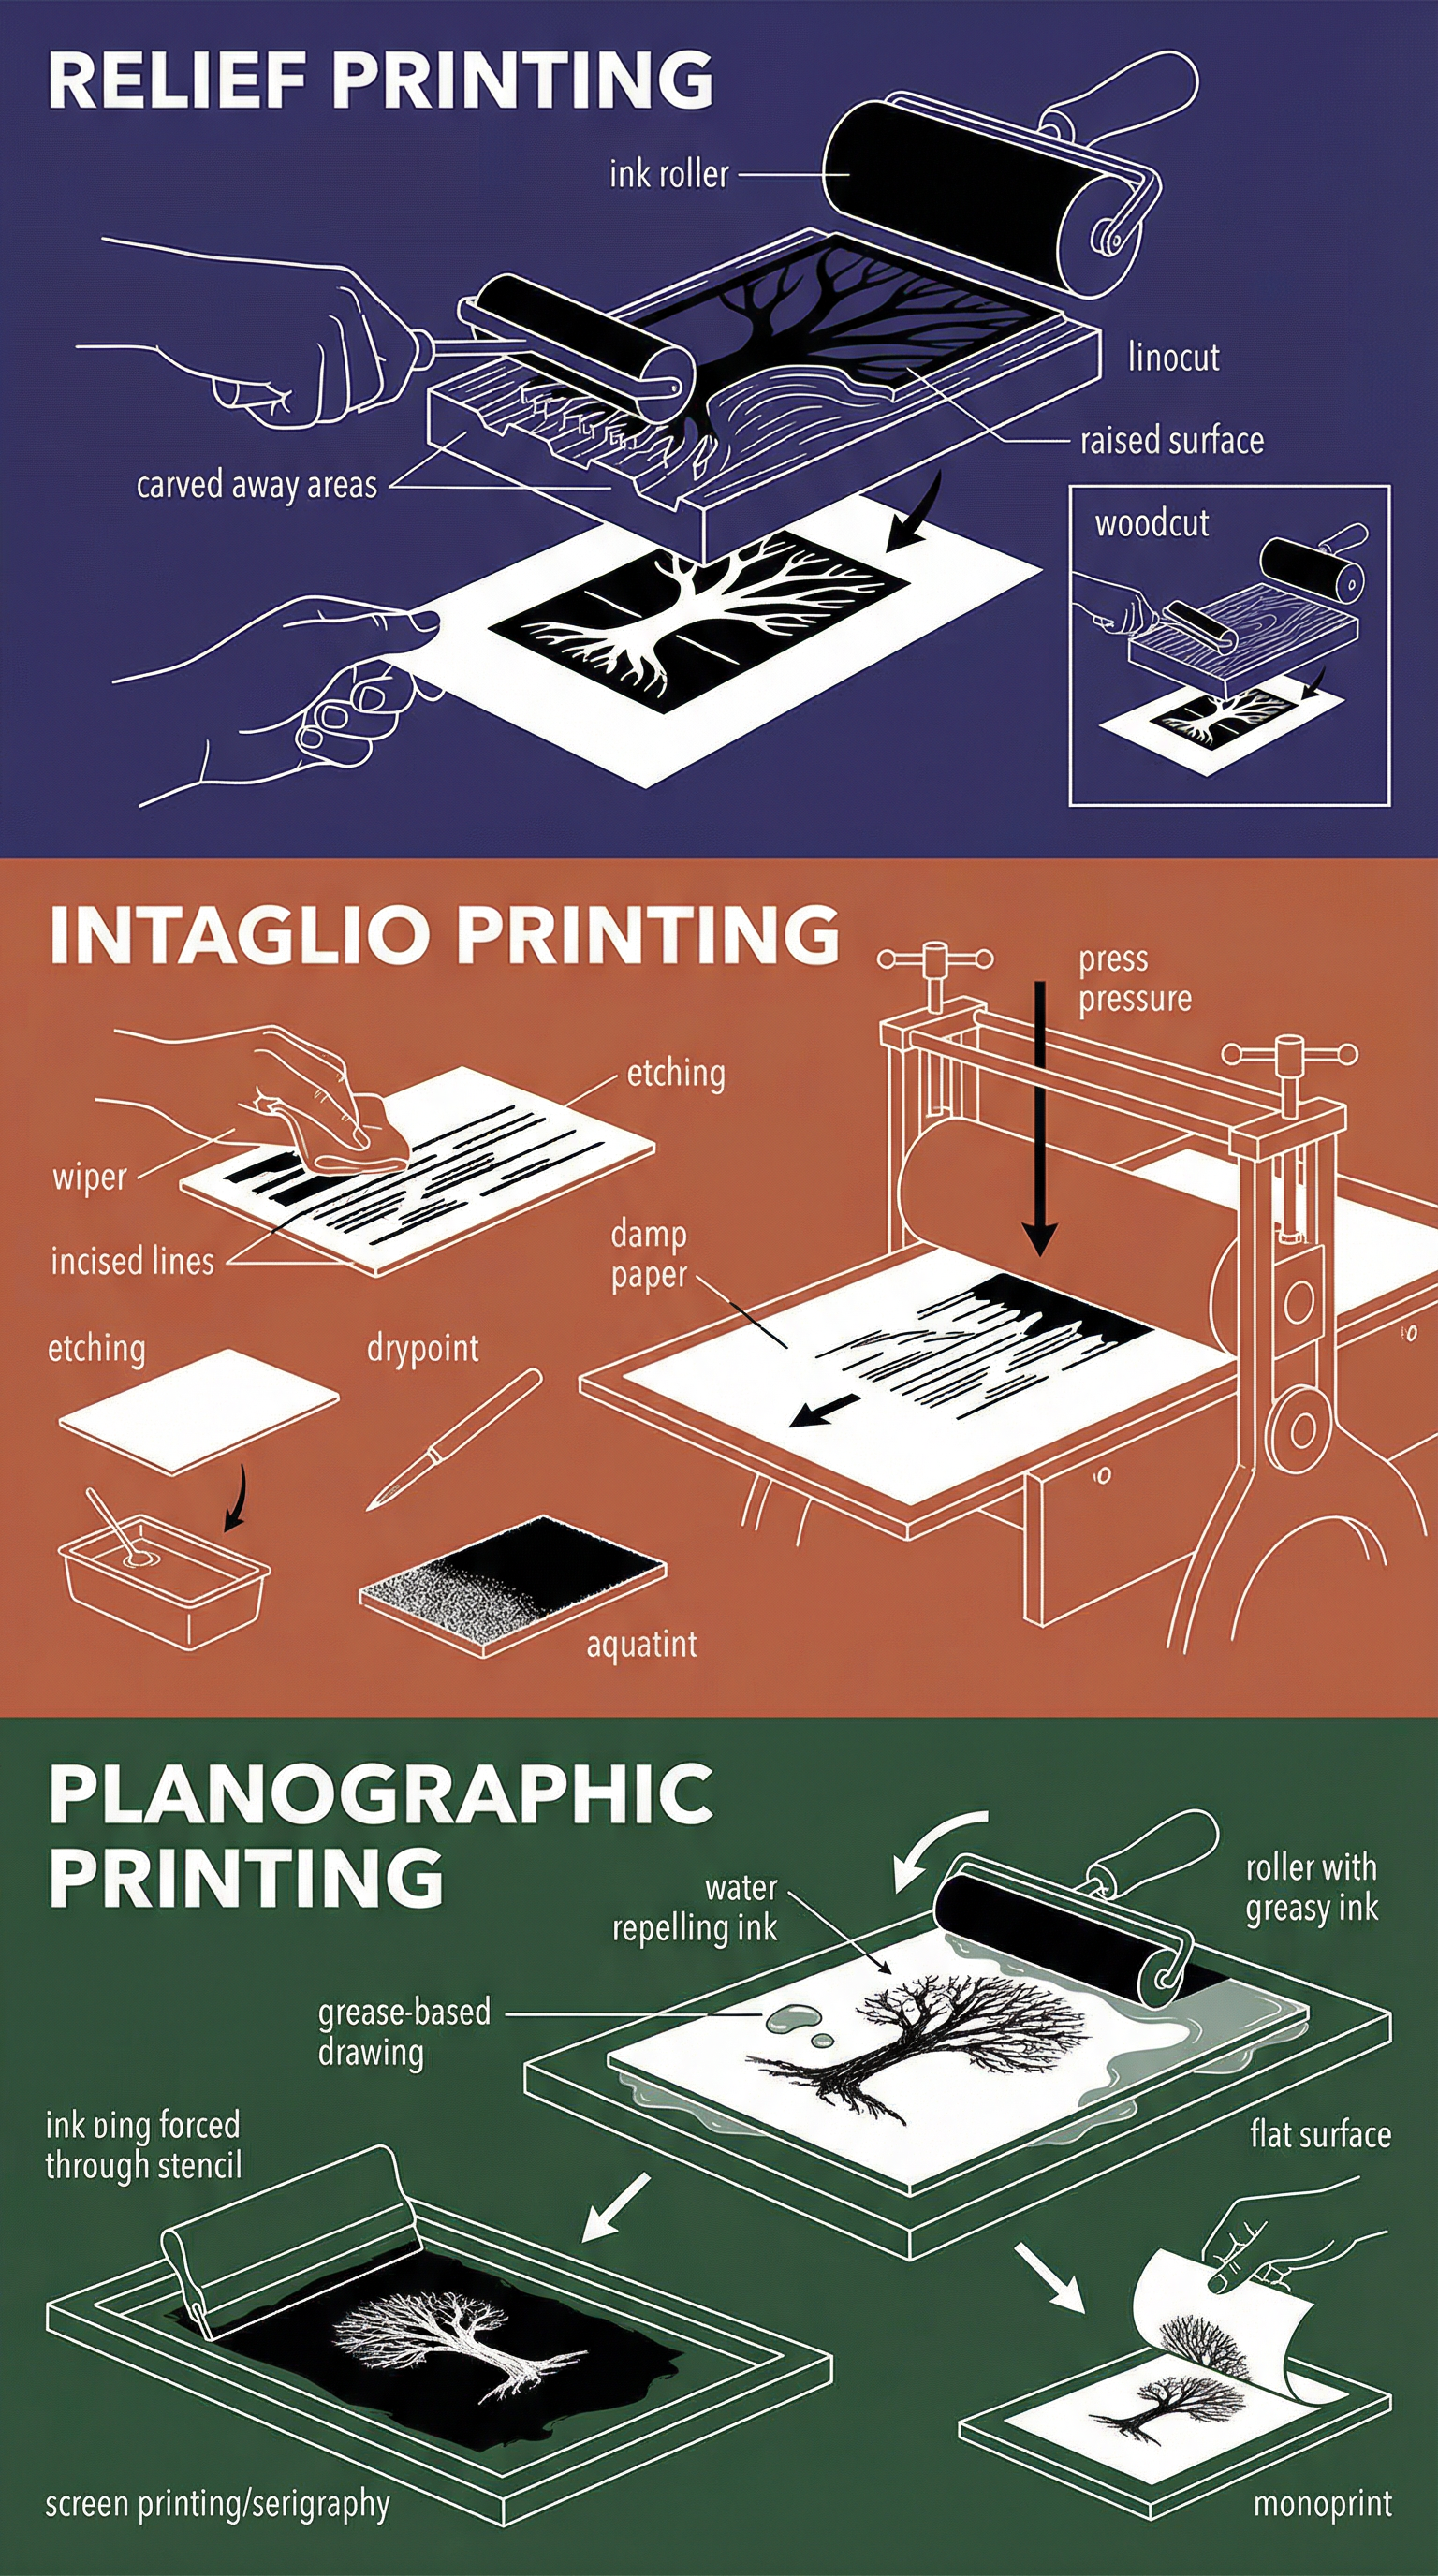
- Relief Printing: The image is created from the raised surface of the matrix. The areas not to be printed are carved away. This process typically produces prints with strong, graphic qualities and bold contrasts. Key examples are Linocut and Woodcut.
- Intaglio Printing: The opposite of relief. The image is held in lines incised into a plate (usually metal). Ink is forced into these grooves, the surface is wiped clean, and a high-pressure press pushes damp paper into the lines to pick up the ink. This allows for fine detail and a wide tonal range. Key examples are Etching, Drypoint, and Aquatint.
- Planographic Printing: The image is created on a flat surface. The process works on the chemical principle that grease and water repel each other. This method is capable of producing a wide variety of marks, from painterly washes to sharp lines. Key examples are Lithography, Monoprinting, and Screenprinting (Serigraphy).
Key Practitioners/Artists/Composers
| Name | Period/Style | Key Works | Relevance |
|---|---|---|---|
| Katsushika Hokusai | Edo Period Japan (c. 1760-1849) / Ukiyo-e | 'The Great Wave off Kanagawa' from 'Thirty-Six Views of Mount Fuji' | Master of multi-block woodcut. Demonstrates exceptional skill in composition, colour separation, and creating atmospheric depth with flat colour. Essential for AO1 analysis of relief printing. |
| Käthe Kollwitz | German Expressionism (1867-1945) | 'Woman with Dead Child' (Etching and soft-ground etching) | Her work shows how intaglio processes can convey powerful emotion. The raw, scratched quality of her lines is integral to the work's meaning. A key link between technical choice (AO2) and conceptual intent (AO4). |
| Andy Warhol | Pop Art (1928-1987) | 'Marilyn Diptych' (Silkscreen) | Pioneer of silkscreen printing in a fine art context. His use of repetition, vibrant colour, and deliberate mis-registration comments on mass media and celebrity culture. Crucial for understanding conceptual screenprinting. |
| Bridget Riley | Op Art (b. 1931) | 'Fragment' series (Screenprints) | A master of precision and optical effects. Her screenprints demonstrate how meticulous registration and colour theory can be used to create illusions of movement and vibration. Excellent for discussing technical control (AO4). |
Technical Vocabulary
Using subject-specific terminology correctly is a key differentiator. Examiners look for it in both portfolio annotations (AO3) and any written component. Credit is given for demonstrating a secure understanding of these terms:
- Matrix: The surface onto which the image is created (e.g., lino block, copper plate, silkscreen).
- Substrate: The surface onto which the image is printed (e.g., paper, fabric, board).
- Edition: A set of identical prints made from the same matrix. Usually numbered, e.g., 5/20 means the fifth print in an edition of twenty.
- Proof: A test print made during the development process. Includes trial proofs, artist's proofs (APs), and state proofs.
- Registration: The method of aligning the paper and matrix to ensure colours are printed in the correct position in a multi-colour print.
- Reduction Method: A relief printing technique (often for linocut) where a single block is progressively carved and printed in different colours, from lightest to darkest. The block is destroyed in the process.
- Aquatint: An intaglio process that creates tonal areas. The plate is dusted with powdered resin, which is heated to create a porous ground, then etched.
- Baren: A hand tool used to apply pressure to the back of the paper to transfer ink in relief printing, an alternative to a press.
Practical Skills
Techniques & Processes
- Lino Cutting (Relief): Start with a clear drawing on the lino. Use V-gouges for fine lines and U-gouges for clearing larger areas. Remember: you are carving away the negative space. For multi-colour prints, consider the reduction method or using multiple blocks.
- Drypoint (Intaglio): Scribe directly into a metal or plastic plate with a sharp needle. The incised line holds ink, but so does the fuzzy burr of displaced material on either side, creating a characteristic soft, velvety line. This burr wears down quickly, so editions are small.
- Screenprinting (Planographic): Create a positive of your design on acetate. Coat a screen with photo-sensitive emulsion, expose it to UV light with your positive on top, then wash out the unexposed emulsion to create your stencil. Place the screen on your substrate, and pull ink across it with a squeegee.
Materials & Equipment
- Inks: Understand the difference between oil-based and water-based inks. Oil-based inks are richer and slower drying, allowing for more working time. Water-based inks are easier to clean but dry quickly, which can be problematic.
- Papers: The choice of paper (substrate) is a key creative decision. Smooth, lightweight Japanese papers like Hosho are excellent for hand-burnishing relief prints. Heavy, damp-stretched papers like Somerset Satin are required for the high pressure of intaglio printing.
- Safety: Always use a bench hook when carving lino to keep your non-carving hand safely behind the tool. Use appropriate ventilation when working with solvents for cleaning oil-based inks or chemicals in etching.
Portfolio/Coursework Guidance
Assessment Criteria
Your portfolio is assessed against four equally weighted Assessment Objectives. Understanding what each one asks for is the key to success.
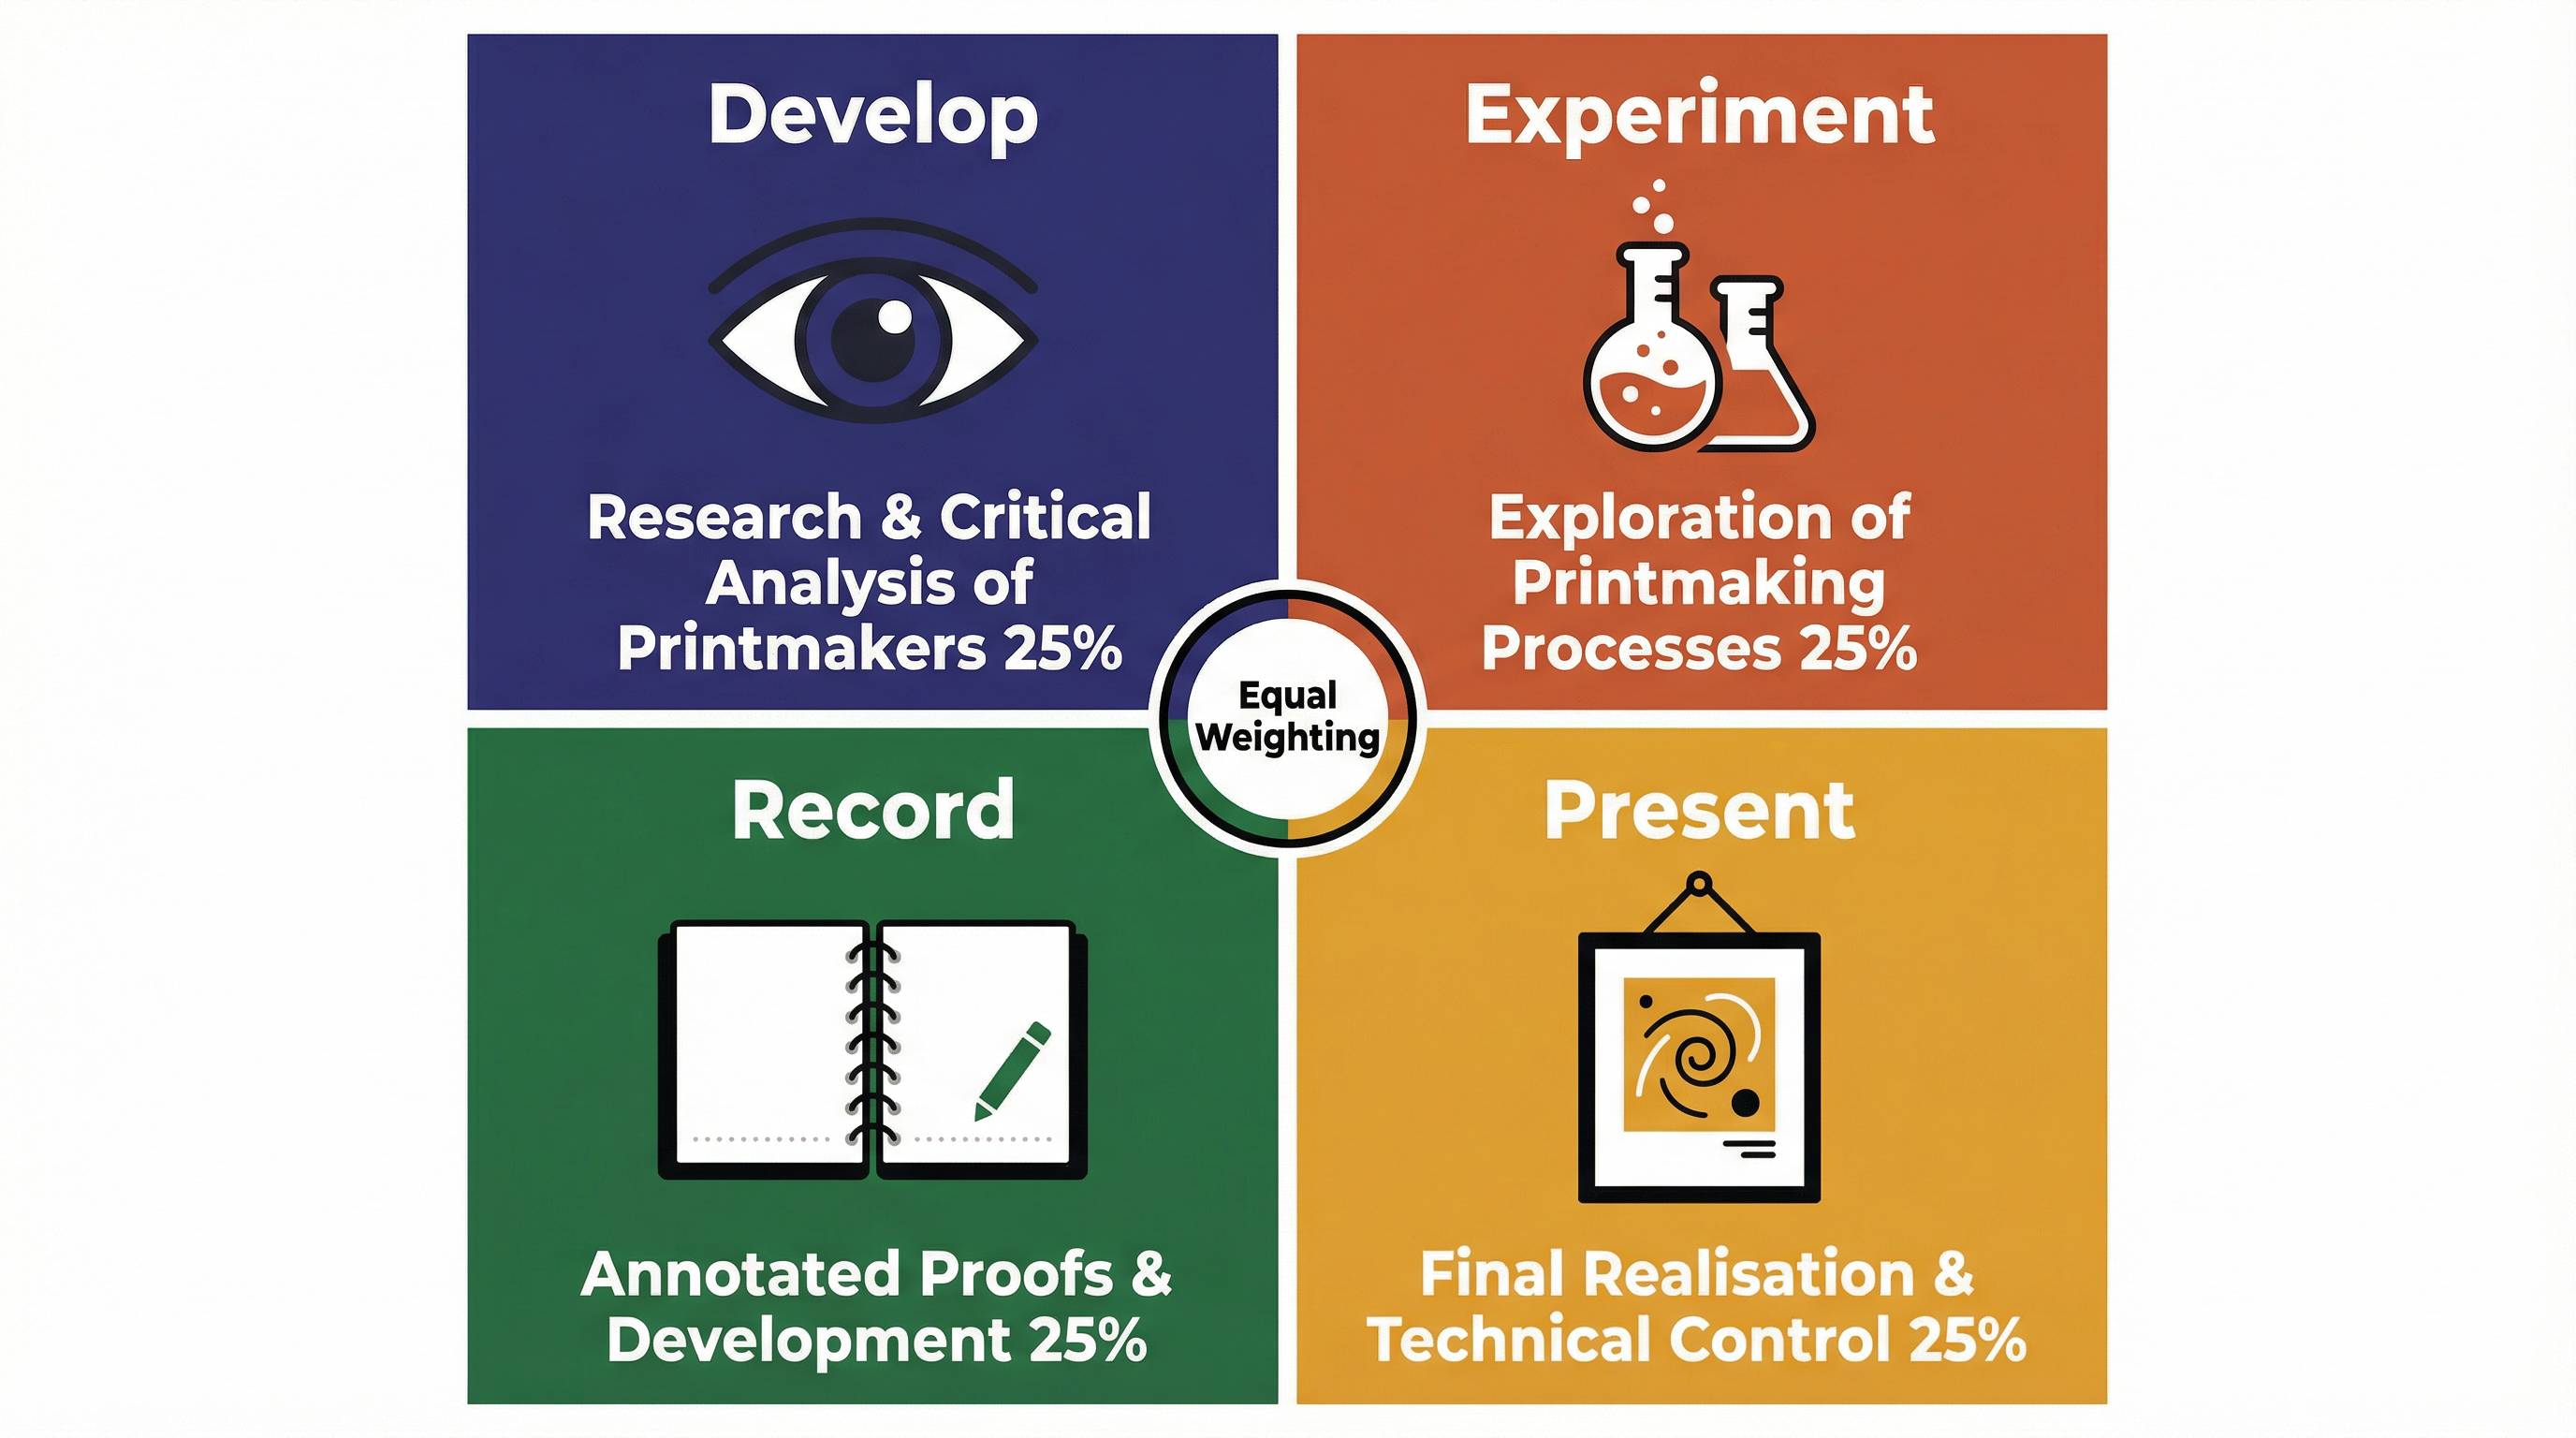
- AO1: Develop: Critically analyse the work of others to inform your own ideas. Don't just describe; explain how Hokusai's use of colour has influenced your own palette.
- AO2: Experiment: Explore and refine your use of media, materials, techniques and processes. This is where you show your journey. Keep all your test prints, colour swatches, and registration tests. Annotate them to explain what you learned from them.
- AO3: Record: Record your ideas, observations and insights. This is your sketchbook and your annotated proofs. Your annotations must be analytical, not just descriptive. Explain why you made a decision.
- AO4: Present: Present a personal and meaningful response that realises intentions. This is your final print or series of prints. It should demonstrate technical control and be a culmination of all your research and experimentation.
Building a Strong Portfolio
- Tell a Story: Your portfolio should read like a visual diary, showing the logical development from initial concept to final outcome.
- Annotate Everything: Annotate your research, your initial sketches, your experimental proofs, and your final prints. Use the technical vocabulary listed above.
- Link the AOs: A top-band portfolio shows clear links between the objectives. For example, an annotation might explain how an experiment with ink transparency (AO2) was inspired by the layered prints of a particular artist (AO1), and how the result helped you to better communicate your theme (AO4).
Exam Component
Written Exam Knowledge
While the bulk of your marks come from the portfolio, you may have a written component or an externally set task that requires you to write about art. You must be able to:
- Compare and contrast the work of different printmakers.
- Analyse how formal elements (line, tone, colour, composition) are used in a print.
- Explain how a printmaking process works, using correct terminology.
- Justify your own creative decisions with reference to your research and conceptual intentions.
Practical Exam Preparation
For the externally set task, you will be given a theme or starting point. Your preparation should involve:
- Mind-Mapping: Brainstorm initial ideas connected to the theme.
- Artist Research (AO1): Quickly find 2-3 printmakers whose work relates to your ideas.
- Initial Experiments (AO2): Plan a series of small, focused experiments with different printmaking techniques that you can complete in the given time.
- Time Management: Break down the available time into sections for research, experimentation, development, and creating a final piece.