Study Notes
Overview
Printmaking is a core component of the OCR Art and Design specification, offering candidates a unique opportunity to blend technical skill with conceptual depth. It is the art of creating images by transferring ink from a prepared surface, or matrix, onto paper or another substrate. Unlike painting or drawing, printmaking allows for the creation of multiple original impressions, known as an edition. Success in this area hinges on demonstrating a systematic and reflective process, from initial research (AO1) and technical experimentation (AO2), through to detailed recording (AO3) and the presentation of a resolved final outcome (AO4). Examiners are looking for more than just a single successful print; they want to see the entire intellectual and practical journey that led to it.
Key Knowledge & Theory
Core Concepts
Understanding the fundamental principles of printmaking is essential for earning marks in AO1 and for informing your practical work. The processes are categorised into four main "families", each defined by how the ink is held on the matrix.
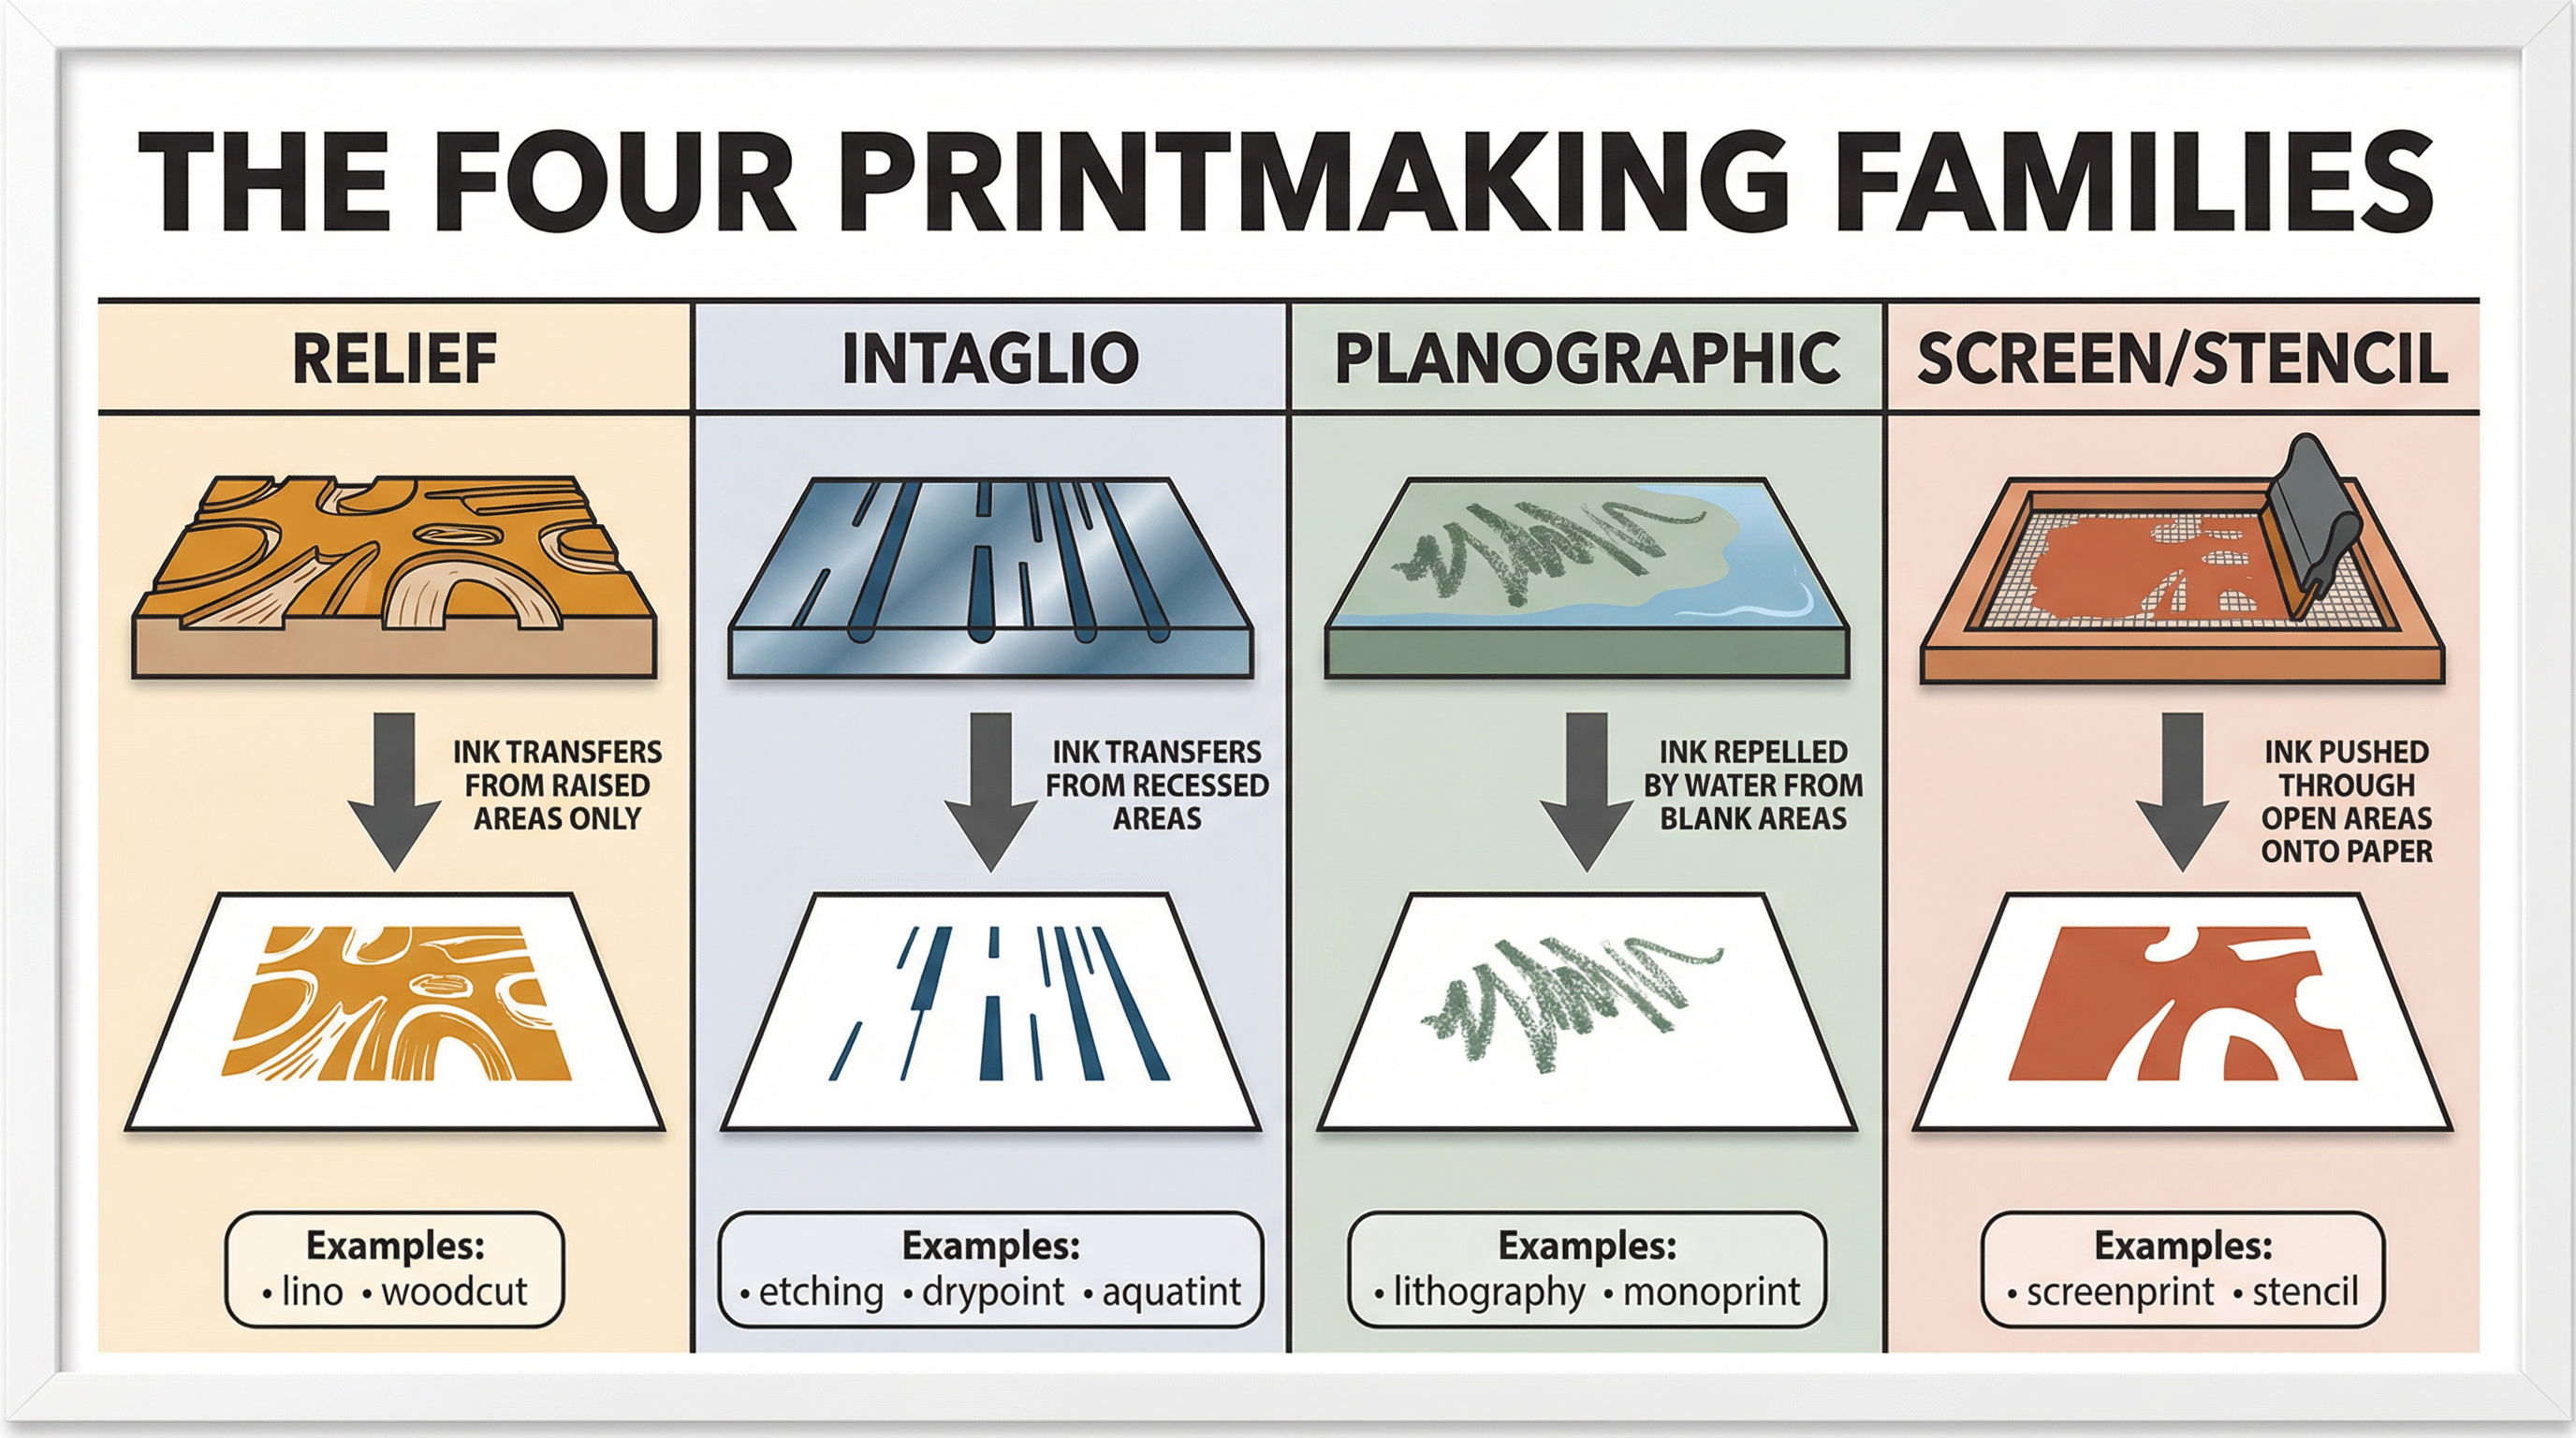
- Relief Printing: The image is printed from the raised surface of the block. The artist carves away the areas not intended to be printed. Examples include Linocut, Woodcut, and Wood Engraving. Credit is given for the expressive quality of the carved marks.
- Intaglio Printing: The image is printed from recessed grooves in a plate. The artist incises lines into the plate, ink is forced into these grooves, and the surface is wiped clean before printing under high pressure. Examples include Etching, Drypoint, and Aquatint. Marks are awarded for control over line weight and tonal variation.
- Planographic Printing: The image is printed from a flat surface, with no carving or incision. The process relies on the chemical principle that oil and water repel each other. Examples include Lithography and Monoprinting. This process allows for more painterly and direct mark-making.
- Stencil/Screen Printing: The image is created by pushing ink through a stencil on a mesh screen. Areas are blocked off to prevent ink from passing through. Screenprinting (or Serigraphy) is the primary example. It is favoured for its ability to produce flat, bold areas of colour.
Key Practitioners/Artists/Composers
| Name | Period/Style | Key Works | Relevance |
|---|---|---|---|
| Albrecht Dürer | German Renaissance | Rhinoceros (1515), Melencolia I (1514) | A master of woodcut and engraving. His work demonstrates how line alone can create immense detail, texture, and form. Candidates should analyse his use of cross-hatching to build tone in intaglio prints. |
| Rembrandt van Rijn | Dutch Golden Age | The Three Trees (1643), Self-Portrait with Saskia (1636) | The foremost practitioner of etching. His use of chiaroscuro (dramatic light and shadow) and the visible evolution of his plates through multiple "states" provide a perfect model for evidencing AO2. |
| Katsushika Hokusai | Japanese Edo Period (Ukiyo-e) | The Great Wave off Kanagawa (c. 1831) | A master of the Ukiyo-e style of woodblock printing. His work is a benchmark for compositional dynamism, the use of bold outlines, and the creation of atmosphere through limited colour palettes. |
| Andy Warhol | Pop Art | Marilyn Diptych (1962), Campbell's Soup Cans (1962) | Revolutionised the use of screenprinting as a fine art medium. His work explores themes of celebrity, mass production, and consumerism, demonstrating how a commercial process can be used for critical commentary. |
| Kara Walker | Contemporary | Gone: An Historical Romance of a Civil War... (1994) | Uses large-scale black cut-paper silhouettes and printmaking to confront racial stereotypes and American history. Her work shows how traditional techniques can be used to explore powerful contemporary themes. |
Technical Vocabulary
Using precise terminology is critical for high-band annotation (AO3) and written analysis. Candidates must use these terms confidently.
- Matrix: The surface onto which the image is created (e.g., lino block, copper plate, lithographic stone).
- Edition: A set of identical prints made from the same matrix. Usually numbered, e.g., 5/20 means the fifth print in an edition of twenty.
- Proof: A print pulled before the edition to check the state of the matrix. Includes Artist's Proofs (A/P), Printer's Proofs (P/P), and Working/State Proofs.
- Registration: The method of aligning the paper and matrix to ensure that multiple colours are printed in the correct position.
- Brayer: A small hand-roller used to apply ink to the matrix.
- Baren: A hand tool used to apply pressure to the back of the paper to transfer ink in relief printing.
- Burr: The raised ridge of metal created when scratching a line in drypoint. It holds ink and creates a characteristic soft, fuzzy line.
- Chiaroscuro: An Italian term for the dramatic use of light and shadow, often seen in Rembrandt's etchings.
Practical Skills
Techniques & Processes
For a high-level portfolio, candidates must demonstrate mastery over their chosen process. This involves more than just following steps; it requires sensitive and intentional manipulation of the medium.
Developing a Linocut Print (Relief):
- Design Transfer: Transfer your design to the lino block using carbon paper or by drawing directly. Remember the final print will be a mirror image.
- Initial Carving (First State): Using a V-gouge for fine lines and a U-gouge for clearing larger areas, carve away the parts of the image you want to remain white. The direction and quality of your marks are expressive tools.
- Inking: Roll a thin, even layer of ink onto a glass slab. The sound should be a faint hiss, not a sticky squelch. Apply the ink evenly to the block with the brayer.
- Pulling the First Proof: Place paper over the block and apply firm, even pressure with a baren or printing press. Carefully peel the paper back.
- Analysis and Refinement (AO2/AO3): Pin the proof to the wall. Annotate it directly. What is working? What isn't? Are there areas that need more carving? Is the ink application successful? This is critical evidence of your thinking.
- Further Carving (Second State): Modify the block based on your analysis. Recarve areas, add texture, or remove more material. Document these changes with photographs.
- Pulling Subsequent Proofs: Pull a new proof. Compare it to the first. Your annotations should explain the changes and evaluate their success. Repeat this iterative cycle until you arrive at a resolved image.
Materials & Equipment
- Inks: Choose between water-based and oil-based inks. Oil-based inks offer richer colour and longer drying times but require solvents for cleaning. Water-based inks are easier to clean but can dry quickly.
- Paper: The choice of paper significantly affects the final outcome. Japanese papers like Hosho are excellent for hand-burnishing, while heavier papers like Fabriano Rosaspina are ideal for intaglio. Experiment with different weights, textures, and colours to evidence AO2.
- Tools: Keep cutting tools sharp. A blunt tool will skid and create uncontrolled marks, which examiners will penalise under AO4.
- Safety: Always cut away from your non-dominant hand. Use a bench hook to secure the lino block. When using acids for etching, ensure proper ventilation and use personal protective equipment (PPE).
Portfolio/Coursework Guidance
Assessment Criteria
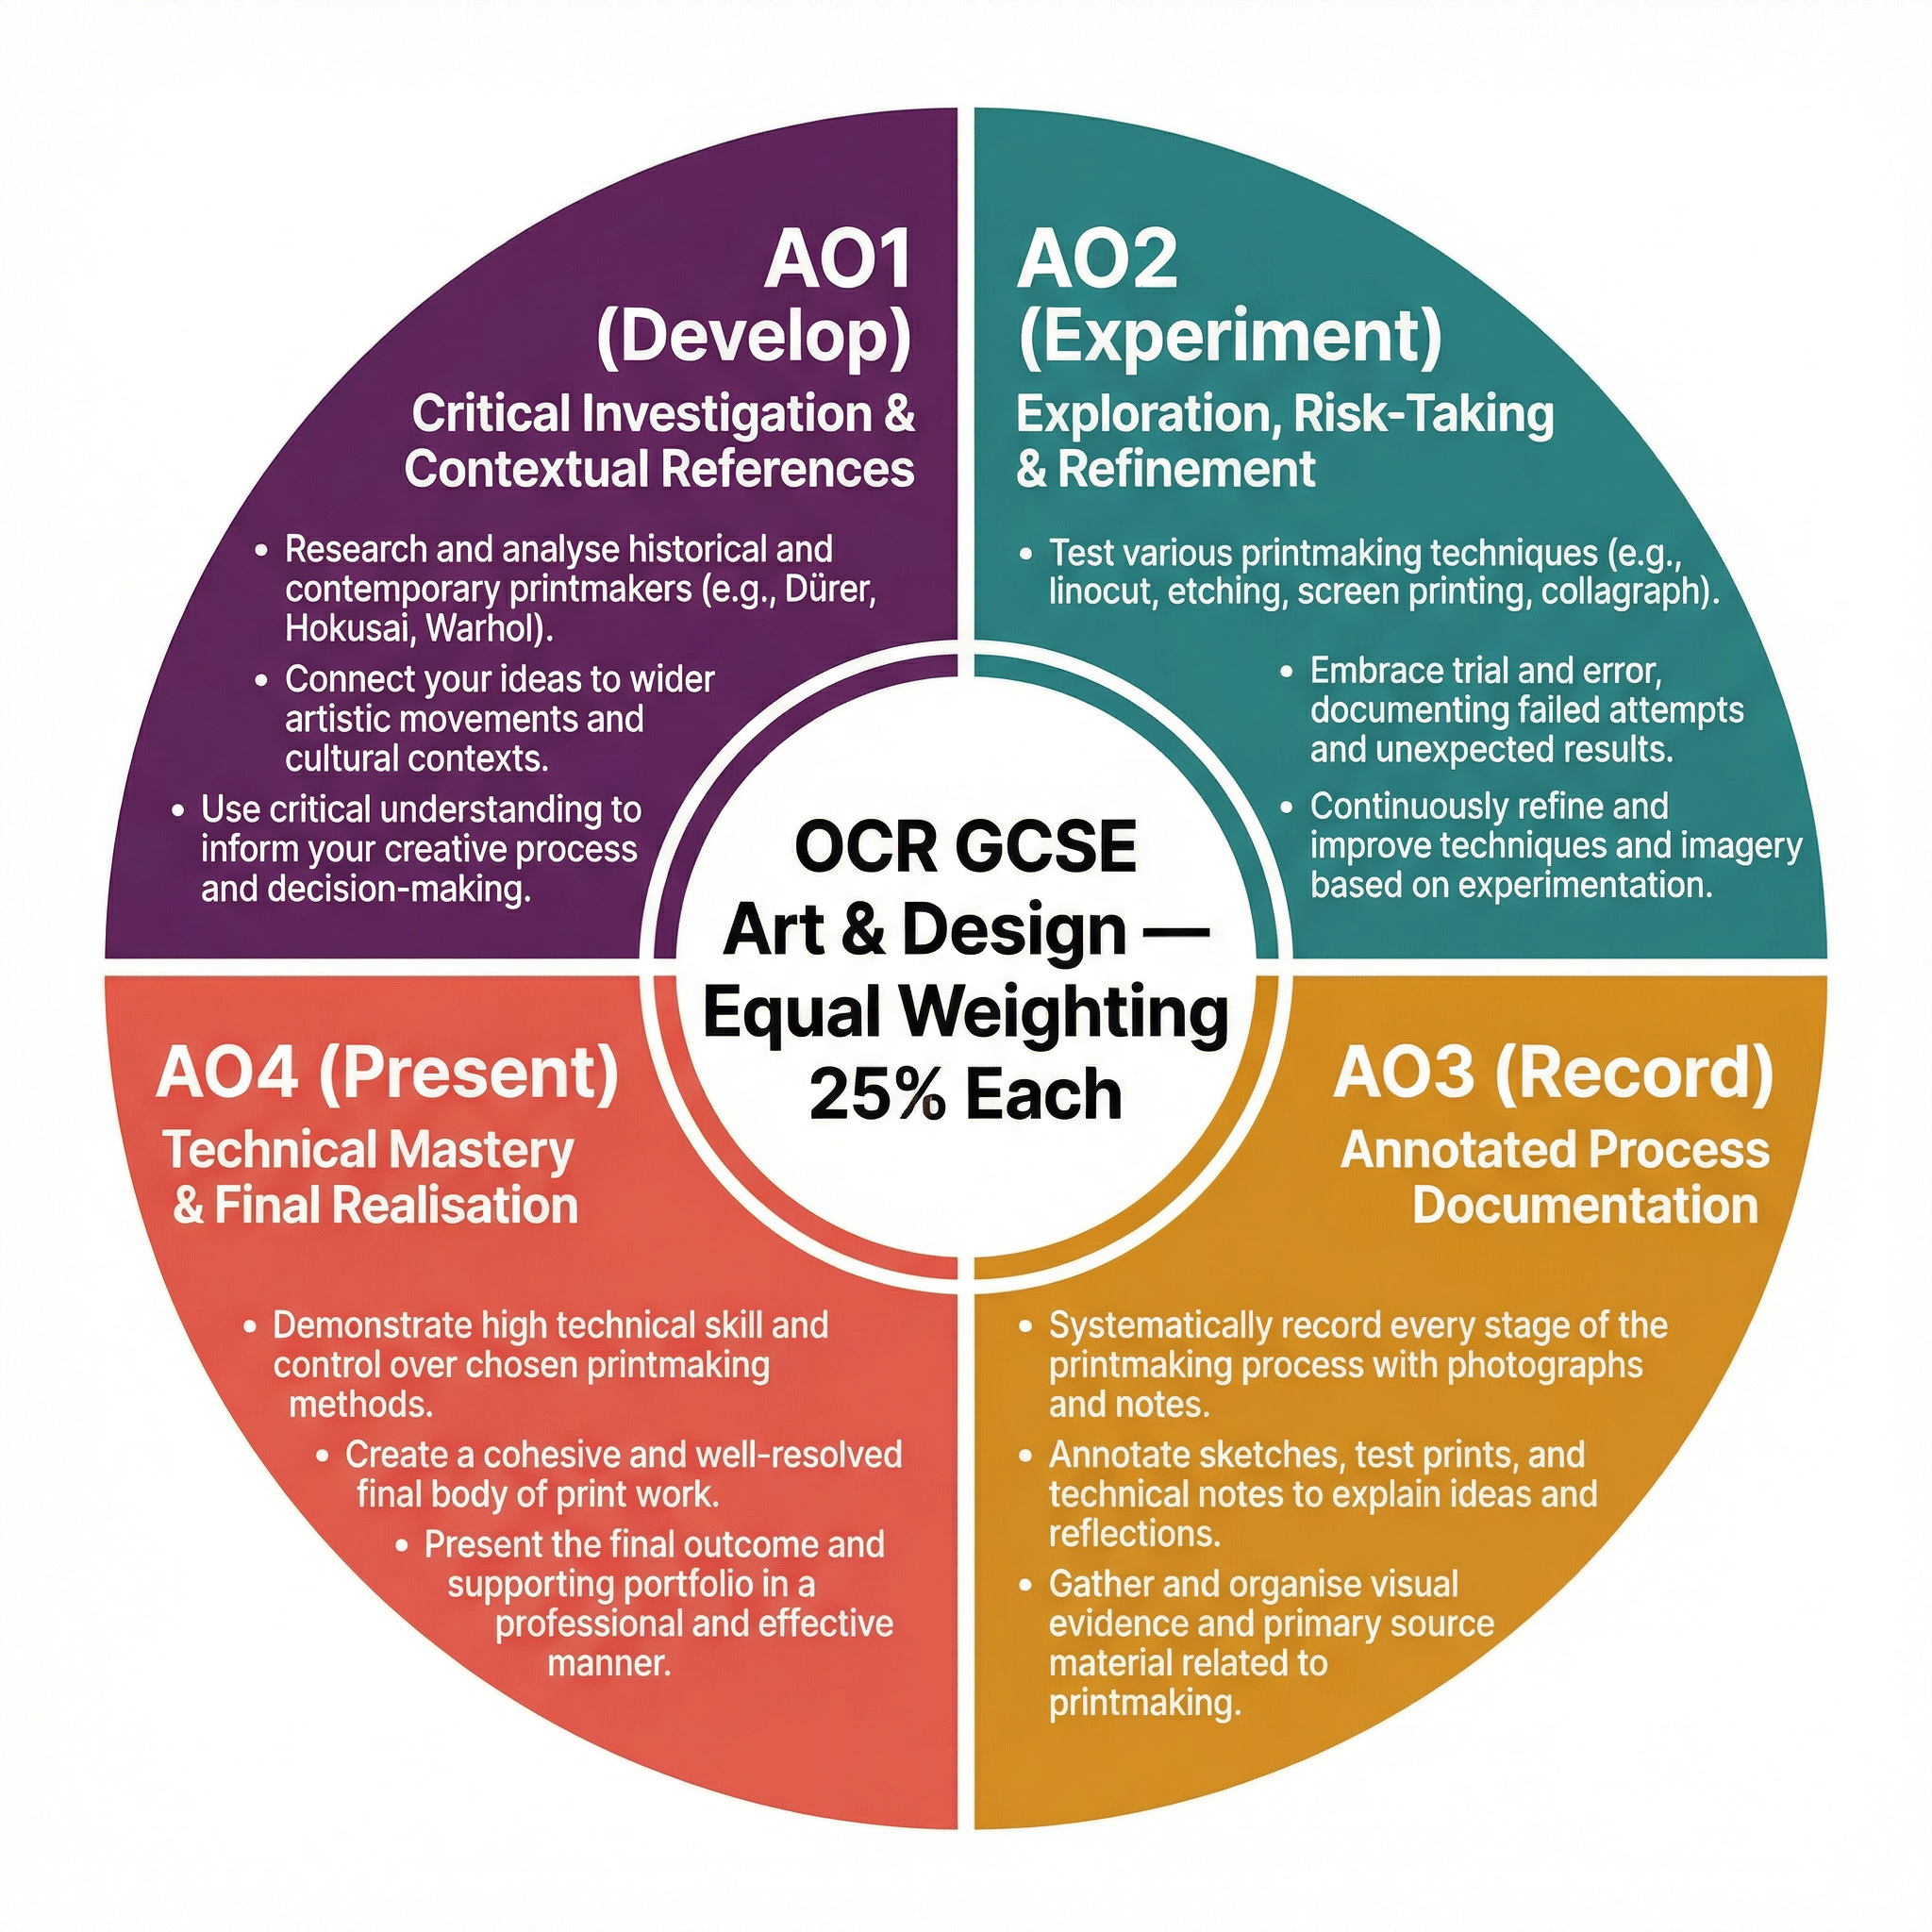
Your portfolio is assessed against four equally weighted Assessment Objectives (AOs). To earn high marks, you must provide clear evidence for all four.
- AO1: Develop: Show you have researched artists and used their work to generate and develop your own ideas. This is not just a history lesson; it's about making connections. Your research should be visually and intellectually linked to your practical work.
- AO2: Experiment: This is about exploring materials, techniques, and processes. It is the core of the iterative cycle. Retain everything: failed proofs, test strips, ghost prints. Annotate them to explain what you learned from your experiments and risks.
- AO3: Record: Document your creative journey. This includes observational drawings, photographs of your process, and, most importantly, analytical annotation. Explain why you made decisions, not just what you did.
- AO4: Present: Create a personal, coherent, and resolved final outcome. This is your final print or series of prints. It should be the culmination of all your work in the other AOs, demonstrating technical skill and a clear artistic vision.
Building a Strong Portfolio
- Tell a Story: Your sketchbook/portfolio should read like a visual diary, showing the evolution of an idea from a starting point to a sophisticated conclusion.
- Annotation is Analysis: Move beyond descriptive comments like "I used a V-gouge." Instead, write analytically: "To create a sense of frantic energy that echoes the work of the German Expressionists, I used a V-gouge to make short, stabbing marks."
- Link Everything: Explicitly connect your experiments to your contextual research. For example: "Having studied Rembrandt's use of the burr in his drypoints, I attempted to create a similar velvety line quality by varying the pressure on the needle."
Exam Component
Written Exam Knowledge
While GCSE Art is predominantly practical, you must be able to articulate your understanding in writing. The externally set task will require you to select a starting point and develop a project, culminating in a period of sustained focus (the "exam"). Your portfolio for this component must still evidence all four AOs. You will be expected to write a short evaluation of your project.
Practical Exam Preparation
- Time Management: The 10-hour sustained focus period is for realising your final outcome. All preparatory work (AO1, AO2, AO3) must be completed beforehand.
- Planning: Go into the exam with a clear plan. You should know exactly what you intend to produce. Have your matrix fully prepared and your materials ready.
- Contingency: What if something goes wrong? A well-prepared candidate will have considered potential issues (e.g., mis-registration, incorrect ink consistency) and have a plan to address them. This demonstrates resilience and problem-solving skills, which can be credited.